HomeVintage Fisher PriceMy Etsy ShopCategoriesAbout

Monday, October 31, 2016

Happy Halloween


Happy Halloween 2016!  I hope your day is spooky and your night full of fun, adorable little people and lots of candy.

For past Halloween Fun check out:

Sunday, October 30, 2016

Lego Friends Birthday Party - Soap Favor

My oldest daughter turned 9 yesterday.  I can't get over how quickly my kids are growing and these birthday parties are getting easier and more enjoyable as they grow.

She decided on a Lego Friend's party theme this year and invited a few of her girlfriends over to the house.  I'll have more details on her party soon but first I want to show you how we made her super cute favors.

I had the idea to give the girls Lego Friend's figures which are the tiny little characters from the Lego Friend's sets.  They are also the stars of the Lego Friend's tv show that is their favorite choice on Netflix.

Since these pieces are so very tiny I thought it would be better to put them into a soap and the idea for soap favors was born.  My daughters were able to help me make them so it was a fun family project.

Here's how we did it:


I purchased the big soap block and a soap mold from Hobby Lobby using a 40% off coupon for $16 (total).  I only used about 1/2 of the block for our 8 soaps so I have plenty for another soap-making-adventure.  

The Lego Friends figures were from eBay and cost about $2 each.

After melting a slice of the soap on the stove (in my stainless pot) I added a few drops of Orange or Lavender essential oil.


The hardest part for us was getting the figures to stay in the middle of the melted soap.  After a little trial and error we found it best to fill 1/2 of the tray, place the figure and then add the other 1/2 of the soap.   We used a toothpick to push down any of the floating figures.  


They turned out pretty good for a first attempt!  We wrapped the soaps with plastic wrap after they were cool.

We put the wrapped soaps into a plastic treat bag and added some candy blocks that look like Legos.  Last but not least we tied the bags with ribbons that look like pink/green blocks.


The favors were a hit and we're pretty proud to have made them ourselves. :)

For more information:

1 inch Pink/Green Block Ribbon from TheFabFind on Etsy.
Lego Friends Mini Figures from Ebay.

I'll have more Lego Friend's party theme details soon including invitations, decorations and games.

Friday, October 21, 2016

Photo Books of Kids Art


Today I have to show off our super cute Art Photo books that I made for each girl.  I am a pretty sentimental and as a result I save everything from baby clothes to lost teeth to kid's art projects.  However, I am trying to do better/save-less and found a pretty easy way to downsize the kid's art.

Since my oldest was a little I've used our ottoman to store her art.  It was pretty under control until we added a second artist.  This summer I decided to do something about it so I sorted, labeled and then photographed their best/favorite pieces.

I ended up with 3 garbage bags of recycling when we were all done.  It was freeing and I didn't feel the loss since I had photos!

After uploading the photos to Shutterfly I made an 8x11 photo book for each girl.  I called them each "Volume 1" since I'll be making more of these in the future.

Both photo books were practically free (just shipping) as I waited to order them until Shutterfly had a free book promotion.


Shutterfly already had a template for little artists so it was very simple to slide in my photos and use the existing embellishments.  I also added a few photos of my artists in action.  

I recommend using the full page layout feature when possible as it makes a big impact visually.


And don't forget to take photos of other forms of art, not just paintings/drawings.


On the back of the book I included big photos of my cuties.


The ottoman is already starting to fill up again, looks like I'll be making another volume before I know it. :)

Tip: As projects come home from school take photos before recycling them.  I'm also taking photos of dioramas (for social studies) and science projects.

Shutterfly often has great promotions on photo books especially around the holidays.  Until November 14th if you're a new customer you can get a free 8x8 book using this link.  It will only cost a little to upgrade to the more art friendly 8x11 size.

For more of my Shutterfly projects check out:


Friday, October 7, 2016

Fisher Price Friday - Lift & Load Depot


For my daughter's 5th birthday this summer I bought her a (almost) complete Lift & Load Depot #942.  We already had the Lift & Load Lumber Yard #944 and a few other small truck/worker sets so I thought this larger Depot would be a fun addition.

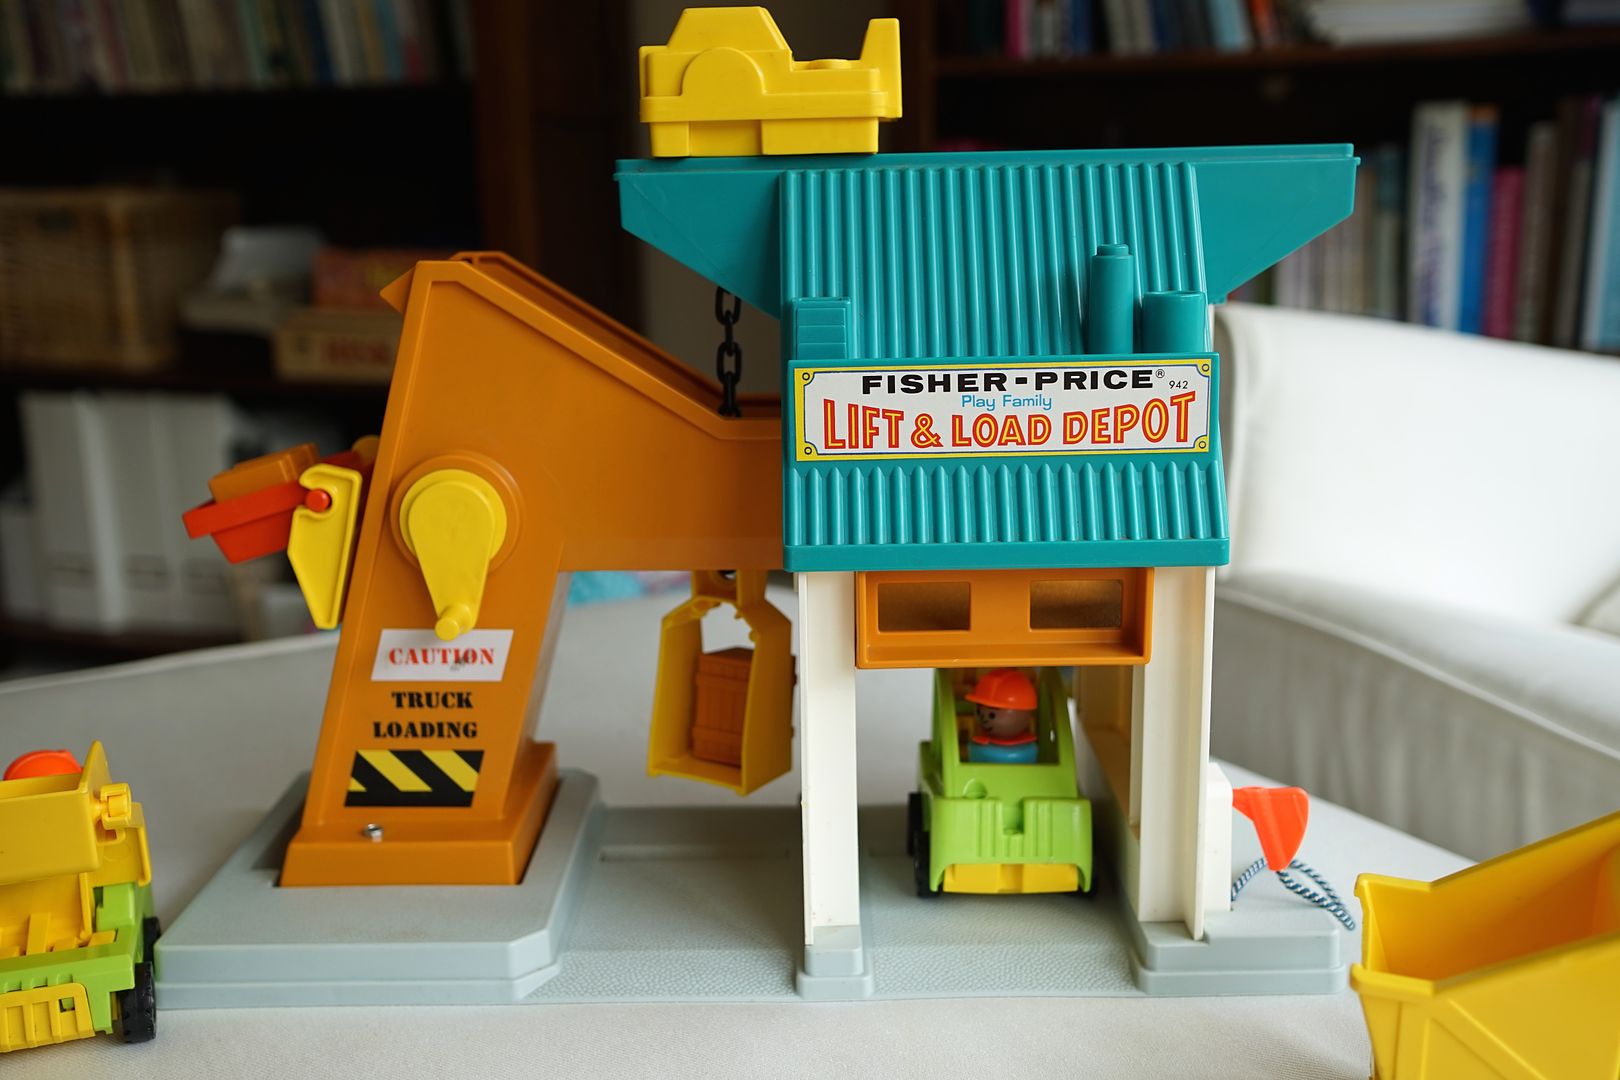
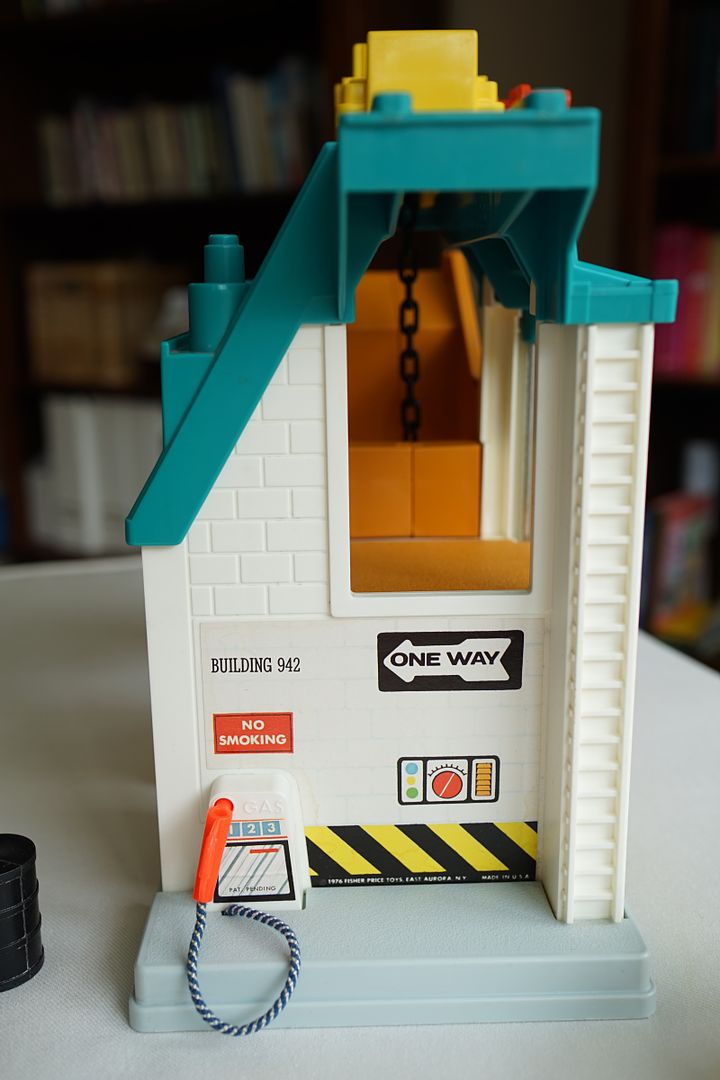
The Lift & Load Depot was the first of the Lift & Load sets and was made between 1977-1979.  Unlike other family oriented Fisher Price sets this was the first set to come only with three adult construction worker men.  The base is made entirely of plastic and there are quite a few accessory pieces and fun ways to play with the base and set.


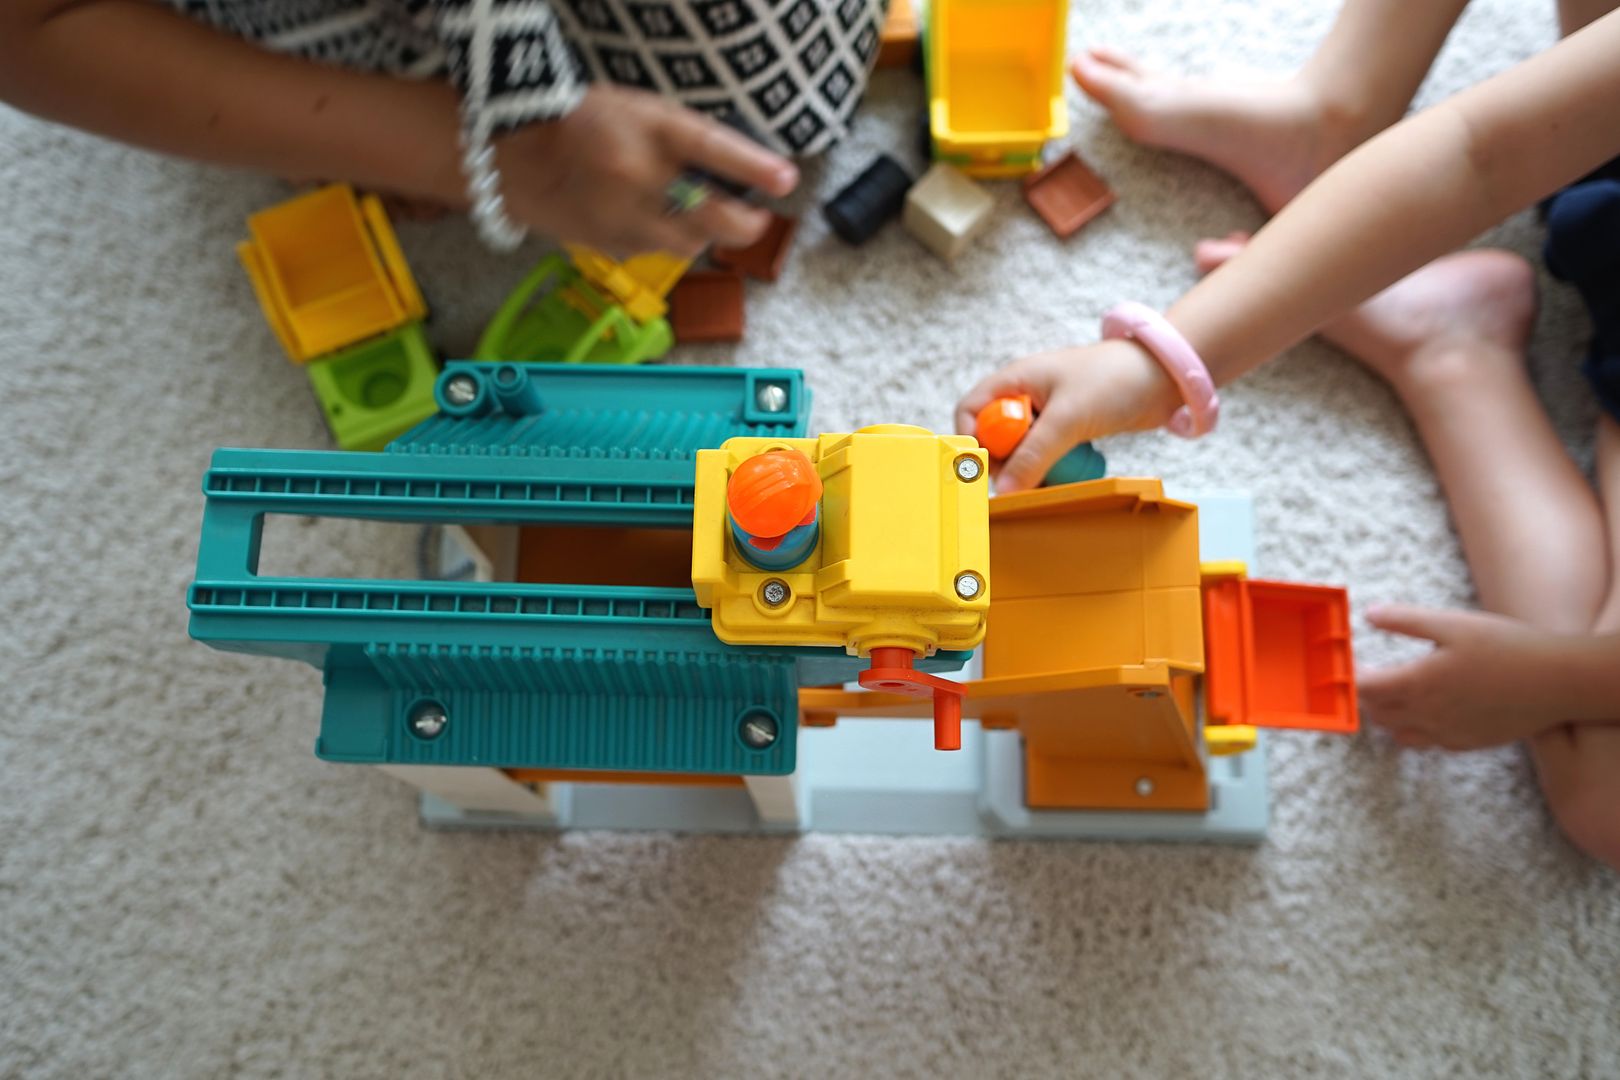
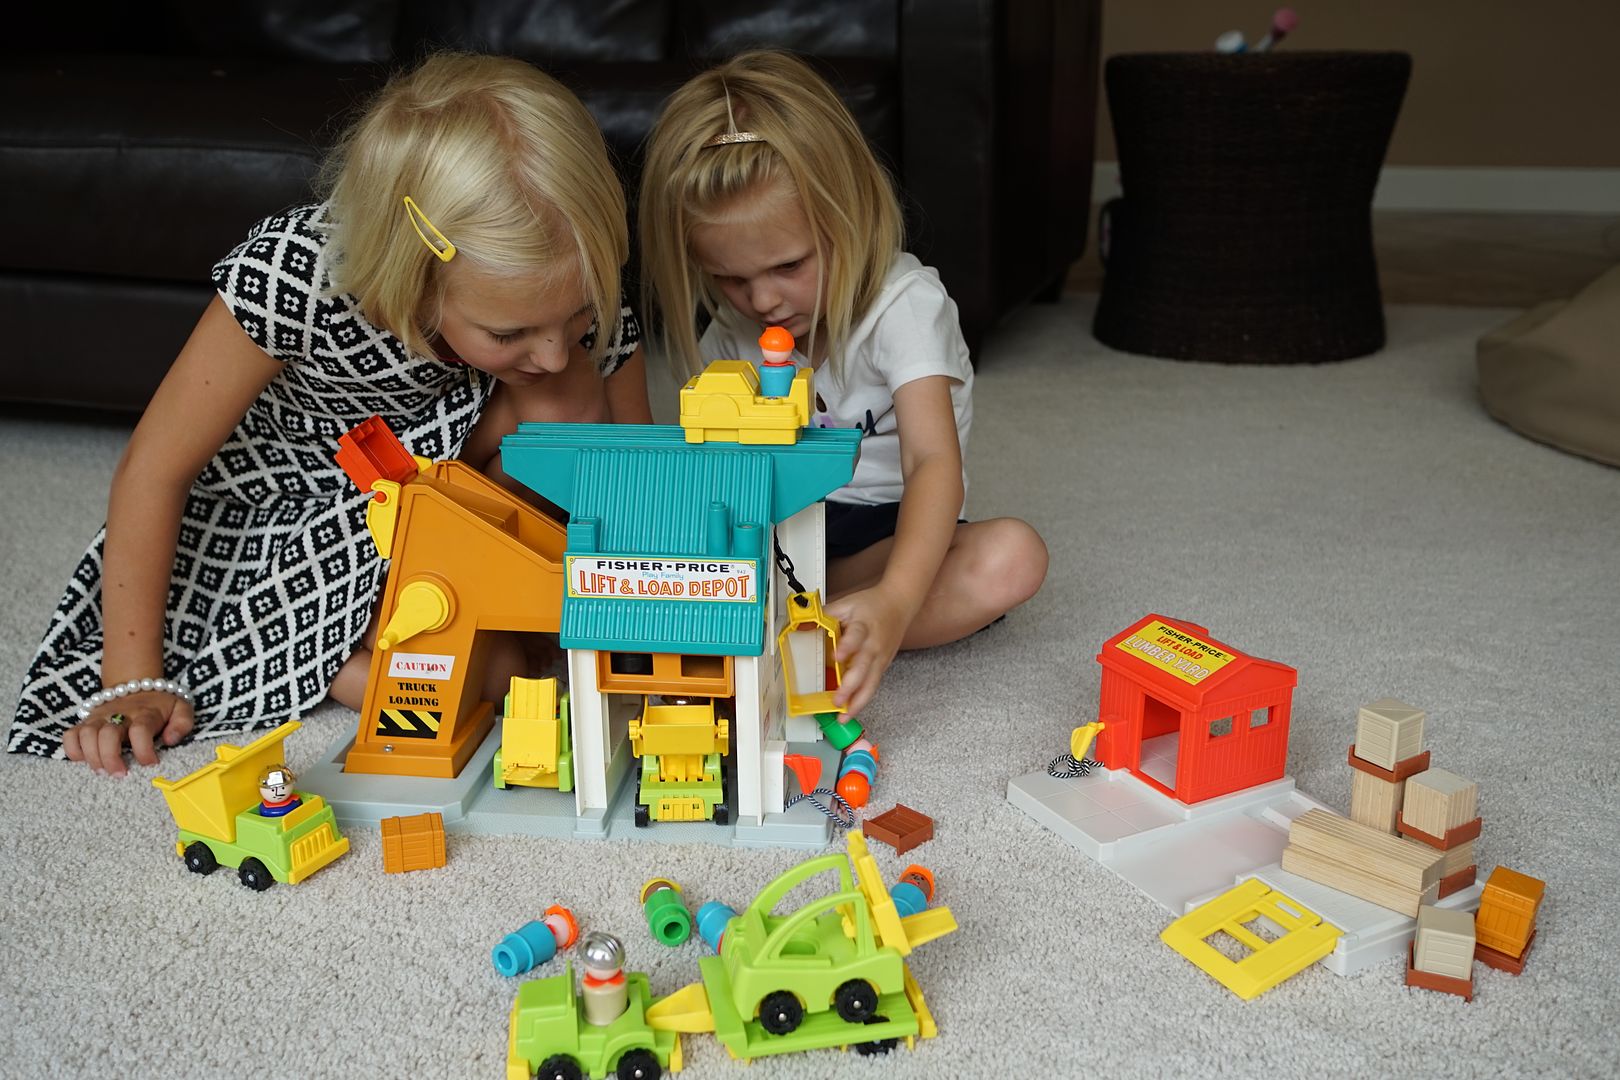
The complete set comes with three vehicles, three people and four kinds of cargo (all plastic). The base came with a trolley car, hopper, chain, cage and lift-arm, but more on those later.

The three vehicles included (L to R) a fork lift w/yellow-spring action fork that goes up and down, dump truck with a tilting bucket and a front loader with a yellow bucket that moves up and down.  All of the vehicles were lime green and yellow.  There were no other color variations.  However, similar vehicles came in orange colors for different Fisher Price sets.

The cargo included 4 brown shipping pallets, 2 black oil drums, 2 grey "wood" crates and 2 orange colored crates.  All of these were made of plastic, no actual wood like the #944 Lift & Load Lumber Yard.  The cargo are pretty cool and can be used in a variety of ways on the equipment included in the Lift & Load base.


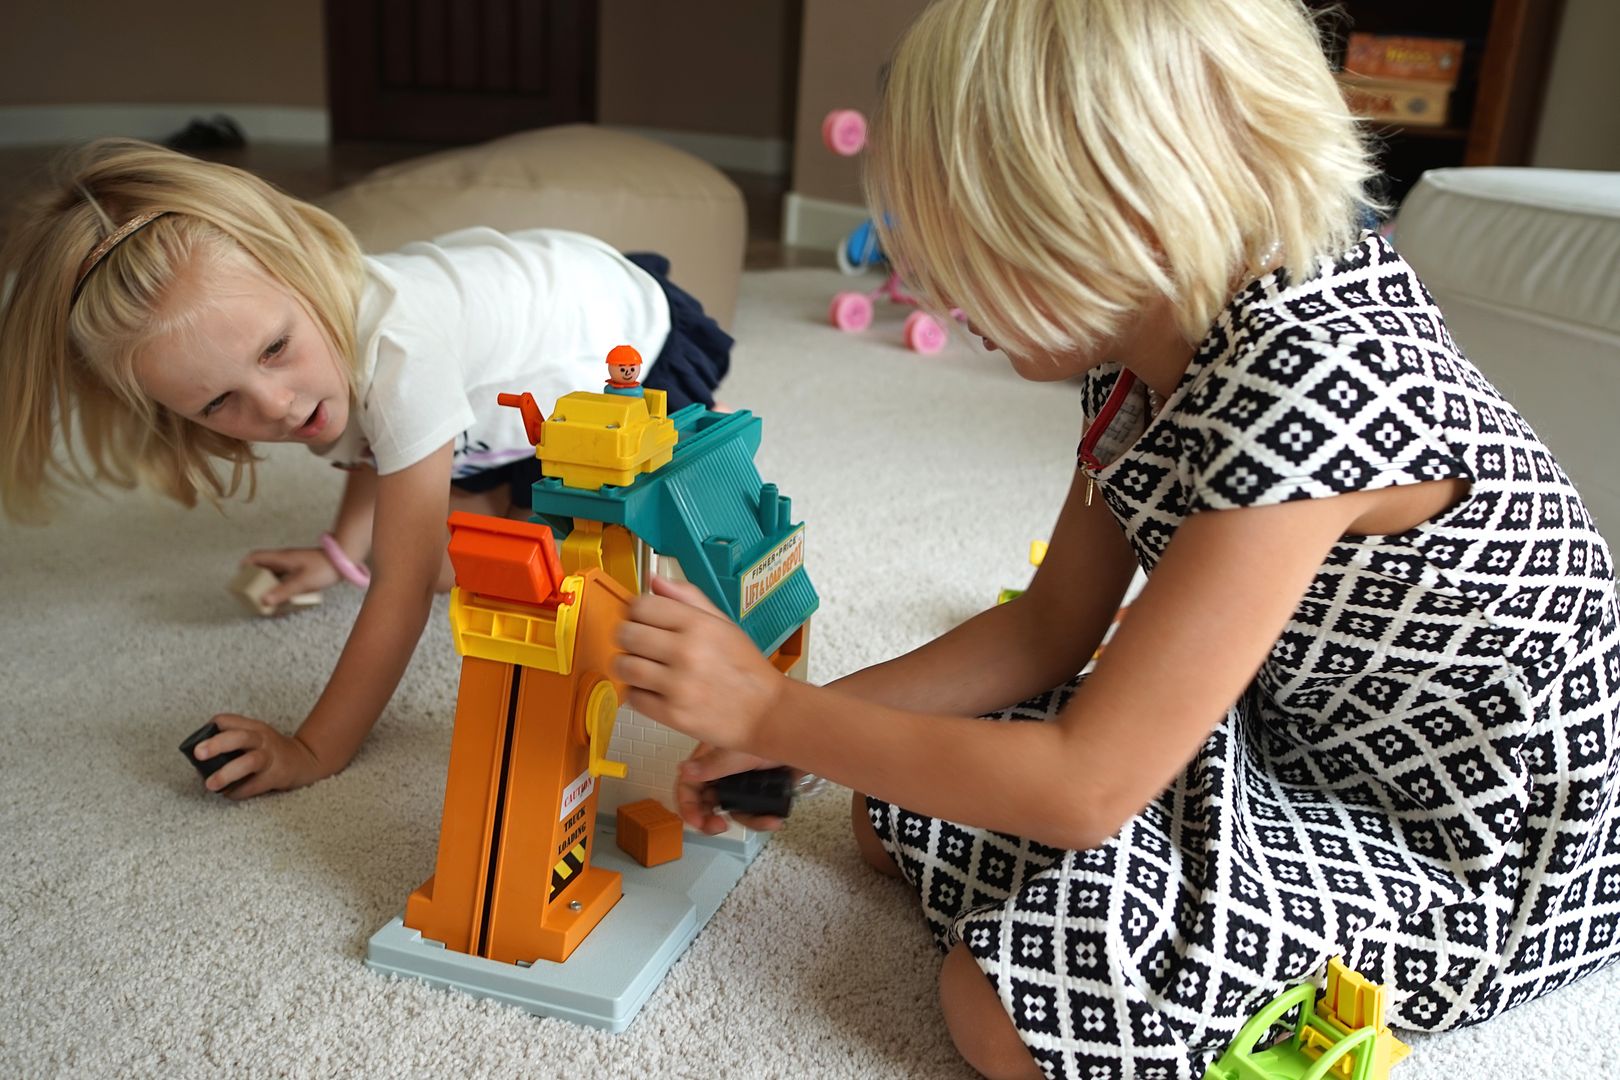
The front and one side of the base have lithographs on them.  This side includes a gas pump and has stickers with caution tape, warning signs (love the "No Smoking") and one way.  Also note that the building is number "942", the same as the set number.  Love the details!  Another extra detail are the "bricks" molded into the white plastic side of the base.  

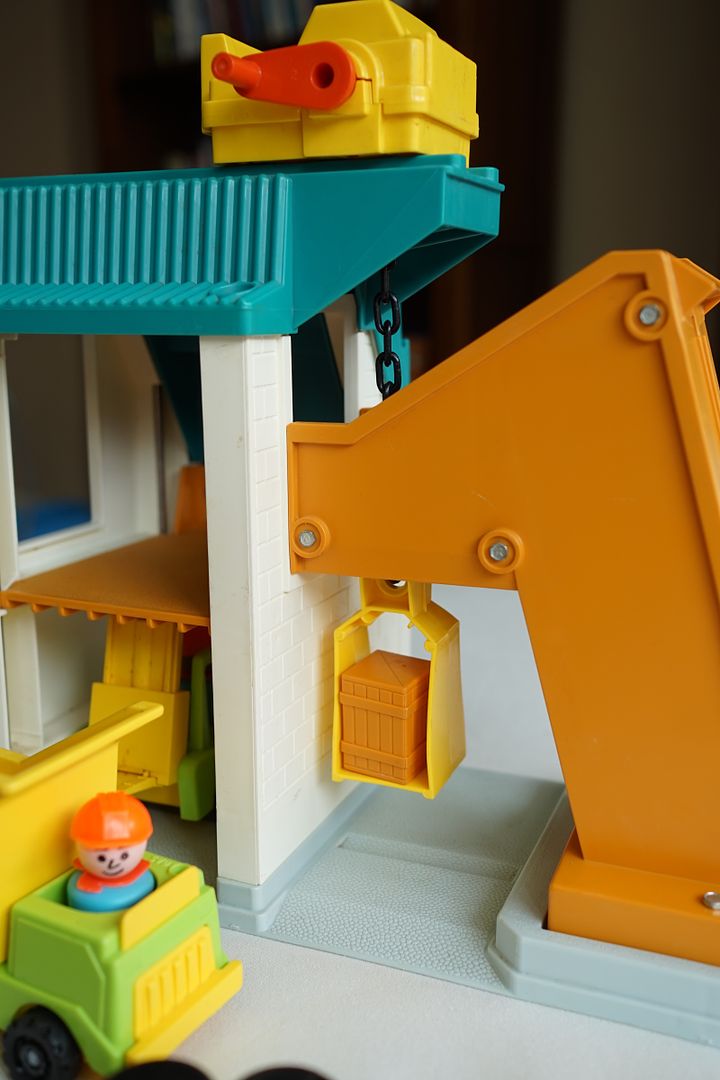
From this view you can also see the top of the yellow trolley car and the black plastic "chain" hanging down.  This plastic chain is often missing from the set.  
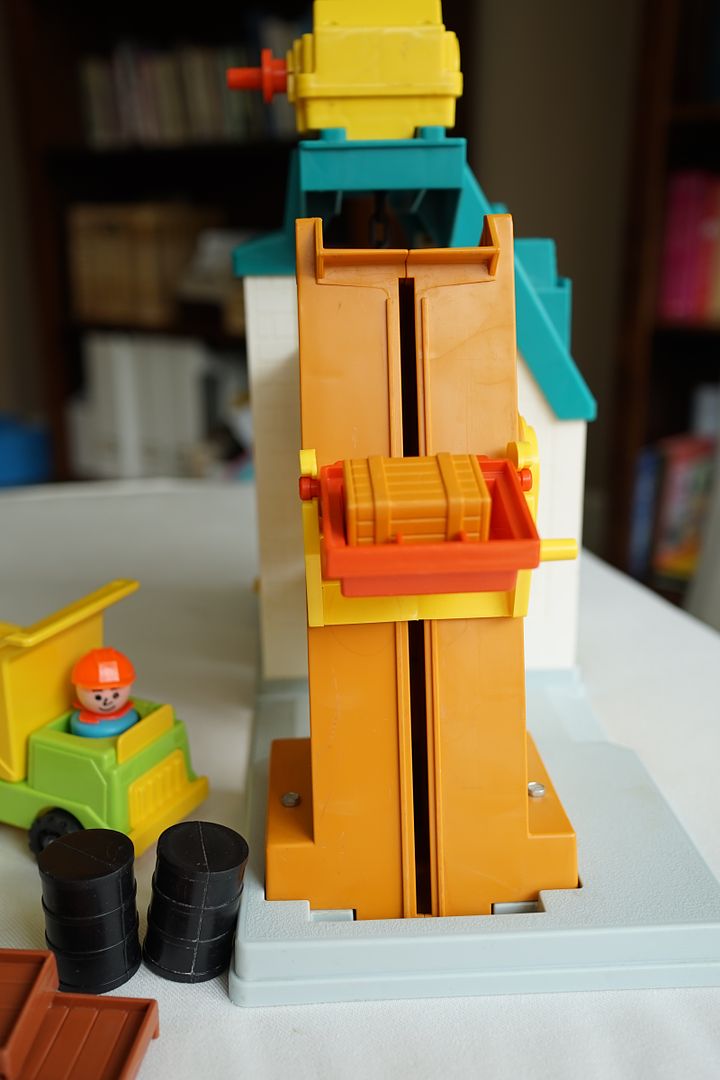
A main feature of the Lift & Load is the dark orange bucket that moves up and down the light brown conveyor belt.  It is operated by a yellow hand crank on the side and is connected to a yellow lift.

Can I just stop right now and say this is super challenging to describe!!  I am out of my depth with this construction lingo, ha!  

So back to the set.  The orange "hopper" bucket holds whatever cargo the kids want to move, at the top the bucket pushes out the cargo and it falls through.  It lands either on the base or if a vehicle is under it will fall on that instead.  Note that the orange bucket is (easily) removable and a result is also often missing from the set.


The top of the base has a yellow "trolley car" that moves along tracks built into the base.  It has an orange hand crank on the side that releases the black plastic chain down through the set.  Attached to the chain by a plastic hook is a yellow cage.  This cage is removable and is very similar to the orange cage from the Lift & Load Railroad #943.

The trolley car has a seat for a worker to ride in.  The yellow cage can old cargo for loading, or even a little standing person if your kids are creative like mine. :)  Note that the trolley car can also let down the cage on either end of the set by moving along the track.


This particular set encourages more than one child to play together as there are many parts and pieces going at once to move the cargo up, down, on and through.


And to make it even more fun we brought out our other Lift and Load Lumber Yard set and the two sets worked well together.  

For more information on the Lift & Load Lumber Yard #944 go here.

Happy constructing!

Thursday, October 6, 2016

Roasted Zucchini and Shrimp Recipe

I've been watching videos on Facebook of recipe preparation again.  There is something mesmerizing about watching someone prepare an entire recipe in 30 seconds.  I end up with dozens of these how-to recipes saved in my account but I rarely actually make one.  Today's recipe was the exception.  

Tasty linked to a recipe called Zucchini "Linguine" with Roasted Shrimp from Buzzfeed. It looked so easy and included simple ingredients that my family (usually) likes so I went for it.  To hedge my bets I made it a side dish rather than the main dish...just in case it was a fail.  Hey, it's happened to me before.  Nothing like preparing a dinner and ending up eating cereal.


I digress.  This recipe was a winner due to it's simplicity and my family actually liking it.  Win-win!!  Next time I'll make it the main dish and skip the extra protein (I did a surf and surf meal - ha-ha- by adding my always-a-winner Ahi with lemon-butter cilantro sauce recipe).

Roasted Zucchini and Shrimp

Ingredients
2 medium zucchini 
1 pound shrimp, peeled and deveined
1/2 yellow bell pepper, sliced thin
1 lime, juiced (about 2 Tbsp)
1 tsp salt
1/2 tsp black pepper
1/2 tsp garlic powder
2 Tbsp olive oil
Parmesan (we preferred shaved) 

1. Preheat oven to 400 degrees
2. Using a vegetable peeler slice the zucchini into long ribbons (like linguine).
3. In a large bowl mix the zucchini ribbons, shrimp, bell pepper, lime juice, salt, pepper, garlic powder and olive oil (I used my hands to evenly coat it).
4. Spread the ingredients evenly on a baking sheet and bake for 8-10 minutes.
5. Add a little shaved Parmesan to the top and enjoy!