HomeVintage Fisher PriceMy Etsy ShopCategoriesAbout

Friday, August 31, 2012

Fisher Price Friday - Creative Coaster & Blocks

I've got a new Vintage Fisher Price toy to show off today on Fisher Price Friday.  The Creative Coaster #987.  I recently saw it online and had to have it for my baby-girl.  She is just the right age for this adorable toy.  Her big sister likes it too, especially the blocks.


The Creative Coaster is a wood and plastic ride on toy that was made from 1964-1982.  The Coaster was inspired by the 1961 Creative Block Wagon.  Basically they took the wagon base and added a plastic seat and hinged steering stick with a wheel on top.  


The Coaster can either have a yellow or blue seat and blue or yellow dowels holding it up.  Notice the lithograph of a speedometer in the front.


The back has a lithograph of a license plate with the FP logo and the toy number 987.

This sweet little coaster was made to ride!  My baby-girl figured it out pretty quickly and climbed right on.


There is a horn in the middle of the steering wheel that makes a beep beep sound.  Each side of the coaster has the brightly colored Fisher Price name and logo.

Inside the coaster bottom it's a bit dirty (normal since little feet and shoes have been there) but you can see the directions for "creative play" and ideas of what the blocks can make.

The front of the coaster is adorable.  I love the "headlights" and notice the license plate looking numbers (it's the toy number 987 again).

The original set came with 18 blocks made of plastic.  The blocks were in sets of 6 different colors: blue, green, orange, yellow, purple and red.  The shapes were triangles, circles and squares.  They fit on 6 wooden dowels made in each of the different colors. 


I bought my coaster on Ebay and it didn't come with blocks or dowels.  However, a lovely FB Fisher Price friend (thanks Janna!) sent me a box of Creative Blocks #666.  Yes, that's right Fisher Price numbered a toy 666.  Anyway, the Creative Blocks set was made from 1978-1990 and came with 4 round shaped blocks, 4 square shape blocks and 6 pie shaped blocks.  It also came with 4 plastic dowels in the colors yellow, orange, purple and blue.


We are thrilled to have these fun blocks with our coaster.  I'm not sure what baby-girl likes more, the blocks, dowels or the coaster!


Happy riding!

Thursday, August 30, 2012

Free Home Depot Kids Workshop this weekend!

It's that time again, another free Home Depot Kids Workshop is this Saturday from 9-12.  This month's activity is described as a "Goal Post Football Game".  My daughter has no idea what football is but I'm sure she'll love making it.  I can also promise you that it will probably be pink.

Last month she made a bulletin board.  As usual it was purple and pink.  She did get a little crazy and add some blue though so that's progress.

Good thing she had goggles in case the gluing got out of control.  Ha!

The finished product!  Who says you can't paint on the actual board part? ;)

Wednesday, August 29, 2012

(semi) wordless wednesday - summer storms in Zion


Last week we stayed at the most marvelous Cable Mountain Lodge in Springdale (UT) at the entrance to the Zion National Park.  One day we took a walk as a storm was a-brewing.

We found a lovely little trail lined with bunches and bunches of yellow sunflowers.

As we walked along I kept an eye on the sky as it darkened.

We made it back just as the drops began to fall.

The girls and I made ourselves comfortable on the porch.

Baby-girl was mesmerized by the falling rain, lightning and booming thunder.

I made myself a cup of tea and enjoyed the show.  Wish I was there right now!

Sunday, August 26, 2012

zucchini chips recipe


Baked Zucchini Chips
Ingredients 
1 cup breadcrumbs
1/2 cup Parmesan cheese, fresh grated
1/2 teaspoon salt
1/2 teaspoon onion powder
1/8 teaspoon freshly ground black pepper
1/3 cup milk
1 large zucchini cut in 1/4-inch-thick slices

Instructions
Preheat oven to 425° F.  Spray a large oven-proof wire rack with non-stick spray and set on a baking sheet. (I used the same rack that is used for my baked red potato chips).  Whisk together bread crumbs, Parmesan, salt, onion powder and pepper in a medium bowl. Place milk in a separate shallow bowl. Dip zucchini slices in milk then in breadcrumb mixture patting the crumbs on. Place slices on wire rack. Repeat until all are coated. Bake for 30 minutes or until golden brown.

The zucchini chips went fast, even baby-girl ate one.  Don't let her face here fool you, she loved them too!  They are best the first day, not so great for leftovers so feel free to eat a bunch.  They are veggies after all. ;)

Friday, August 24, 2012

Fisher Price Friday - Play Family Snowmobile


Today on Fisher Price Friday let's pretend that it's not the hottest part of summer.  Let's take to the slopes with the Play Family Mini Snowmobile #705 instead.  The mini snowmobile was made from 1971-1973.  The set came with a snowmobile with detachable sled and matching runners.  The runners could either be black or red but should always match.  The windshield can be either red or black as well but should match the runner.  The inside of the snowmobile can be either red or black but is the opposite of the runners.  Got all that? ;)


The set came with three people; two children and a dog.  The children were a boy and a girl, both with aqua bodies.  They had wood bodies and either a wood or plastic head depending on the year it was made.  Lucky the dog should have a red collar and in the original version he had the metal rivet holding his ears down.


The little girl pictured is the original one, but I am missing her brother.  He would have a red hat worn sideways, freckles and a big grin.  He was enjoying the snow after all!


The snowmobile holds two little people who bounce up and down when you move it.  It has a windshield on the front and lithographs on each side.  The sled in the back seats one and has a matching hitch to connect it with the snowmobile.  It is always yellow.


Each side of the snowmobile has the same turquoise lithograph.  It has a delicate snowflake with the Fisher Price logo inside.  Also the words "mini Snow mobile" and the year 1970.

Inside the snowmobile there is a little lithograph of a control panel.

Maybe it's wishful thinking since it's so hot in Phoenix but I can imagine the cold winter air looking at this toy.  Although I wouldn't recommend letting a dog drive.  Ha!

Thursday, August 23, 2012

Clay Babies from Fox Island

What do these interesting looking rocks look like to you?

These are clay babies (sometimes referred to as claybabies).  When you take clay and tidal waters in just the right circumstances you get these fabulous one-of-a-kind formations.  Over time the water swirls around the clay banks and creates shapes that eventually pop off and float away, to be discovered by eager beach combers.  They are also known as "concretions" which are defined as "a rounded mass of mineral matter found in sedimentary rock".  I think they are the cutest little rock people, animals or shapes.  They are whatever your imagination sees!

I grew up seeing clay babies and had no idea how special they were.  Besides being cute they are only created in two places on this entire planet (the other being New Zealand) and my grandmother's house in Washington State just happened to be near one of them.  So I saw them at her house frequently or would find them on the beach in front of her house.  My parents live there now and my mom has baskets full of them.

My niece and baby-girl sorting through the baskets.

This summer when we went out for a visit I learned about their uniqueness.  My girls were also interested in these funny looking "rocks".  My 4 year old was oh-so-happy to add them to her existing rock collection.  My baby was thrilled to have something else to put in her mouth. ;)  

This is where the magic happens on Fox Island.  There are often people walking these beaches looking for clay babies, they make the perfect trip souvenir.  I also found a woman collecting them to be sold on eBay at $5 a pop!  I've heard that they just recently closed this beach to the public though, and you can only get access through a group permit.  Hopefully this is only temporary because this beach is such a gem!

Here are a few of my mom's.  I think the one on the right looks like a dachshund and the one on the left resembles a really big turtle.

I read about a marvelous Indian Legend to explain where clay babies come from.  This is from the Fox Island Museum:

According to an old Indian legend, an Indian maiden used to play there in the sand, many many years ago and shape the mud into various forms.


When the girl grows up she is sought by Indian men near and far, but none suited her until a mysterious young brave appeared to her as she walked along the beach. Eventually the brave wins her over – the only condition is that she must live with him beneath the surface of the water because he is the son of the old man of the sea. She goes back and forth between her life under the sea and her life on land, but after a while she starts growing kelp on her face, and her parents tell her that she probably should not return anymore. Now when she becomes homesick for her old home, she goes to her former playground and makes the odd shapes which visitors find on Fox Island’s beaches.


My mom and daughter looking for treasures on Fox Island.

We took a few home and I have them displayed in my bathroom.  A fun reminder of our summer adventures at the beach.  

Until next summer! (and yes, my daughter is wearing a sweatshirt and we were there in JULY!!, so different from Phoenix)

Tuesday, August 21, 2012

How not to stink (natural deodorant secrets).

As you know I live in hot-hot Phoenix.  Let's just say that high temperatures make it a big challenge to stay, ahem, not-so-stinky. ;)  To add to the challenge I only use natural deodorants, no antiperspirant or fancy chemicals for me!  The products above are just a few of the ones I've tried.  I've found that if I switch up the brand from time to time they work better.  I also strangely enough had some work great while I was pregnant and some not work at all, even though they had worked before.   

When the temperatures are high in the summer none of these deodorants work all day though, so I have a couple secrets to keep me smelling like a rose.  Well, not a rose but not a skunk either.  And the best news is that you most likely already have everything you need!

Alcohol.  That's it.  Alcohol instantly takes away the stink because it kills the bacteria, which is what you are smelling.  I use rubbing alcohol and put it in a small spray bottle that I already had.  A couple spritzes and I'm good as new.  You could put a bottle this size in your bag and it would be pretty discreet. 

If you like fragrances you could also try a body spray directly in your armpits.  Most of the body sprays have a high alcohol content, just check the label to be sure.

Now, if you are out and about and don't have a bottle of alcohol nearby you can always use hand sanitizer.  Most hand sanitizer is almost all alcohol (unless you have a natural brand).  It is a little harder to be discreet when putting sanitizer in your pits, but with a little practice I'm sure you can be sly like me. ;)  Another bonus to hand sanitizer is that these days it is everywhere!  You can get it quickly in many public restrooms, stores or restaurants.

If you have any other natural non-stink secrets please pass them on.  Oh, and if I ask to borrow your hand sanitizer it might not be for my hands.  Ha! 

Here's to not stinking!

Monday, August 20, 2012

I love Shutterfly photo books - Hints and Tips


If you know me it will not be news to you that I love Shutterfly.  I have been a loyal customer for some time now making a few hard backed photo books every year.  But you may not know that for the most part I get my books discounted or free (just the cost of s/h).  If you have an account and are patient you can usually find codes for free/discount offers on a regular basis!

Tip #1: Make your books ahead and then wait for a special offer, like 40% or free.   

I've made a book for each year of my girl's lives (they each get their own).  I also make books for big trips or special events.  When my firstborn was just a baby I made a book about Family since all of our relatives live in different states or countries.  That way she can get to know the family that we rarely see at least by photo/name.

Tip #2: Make a photo family book with pictures and names of extended family (and special friends too).  

I spend hours sometimes putting together the books with just the right layouts, "stickers" and colors.  Shutterfly has a way to make it much easier with Simple Path, you just load your photos and they lay them out for you.  However, I prefer to use their Custom Path so I can make each page exactly the way I want. :)

Hint #3: Use Custom Path and add extra stickers and layouts beyond whatever theme you choose.  

There are hundreds of different boxes, theme stickers and other decorations for your pages.  That alone can take hours to go through though, be warned. :)

Hint #4: Don't load up your pages with too many photos.  

This is a hard one for me as I have the hardest time editing down the 100's (thousands?) of photos we take each year of our girls.  However, unless you get a big book they can look too small and crowded (I get 8X8).  It makes a bigger statement to have one big photo on a page, especially if it's a great one!

Don't forget the back, you can put photos or words on the back of your book.  On the back of this Family book I put a bible verse about children.  That is my oldest when she was about 6-7 months old with her cousins.

Another option is to put a bunch of your favorite photos that didn't fit inside the book.  Of course I'm going against Hint #4 by saying this. :)  

Hint #5: Put a quote from your child's favorite book on the back cover each year.

Book quotes are a fun way to remember what you read together when they were young.  The back cover pictured above had a quote from a Berenstain Bears book about having a new baby sister.

This was baby girl's book of her first 3 months.  I got a free book code from one of the formula companies.  She's never had formula but they keep sending us free samples, coupons and offers including this free book!  I put a simple bible verse on the bottom.

Right now I'm working on completing baby-girl's first year book.  I did something a little different and have one big photo on the front and one big photo on the back.  No book quote this year on the back since she really doesn't have a favorite book yet (she's more about chewing them than listening to me read).

Hint #6: For a kid's once a year book put one (big) photo on the front from the beginning of the year and one (big) photo on the back from the end of the year.  

This is a great way to see from front to back how they've changed.  

Shutterfly also makes soft cover books.  I've made vacation books with soft covers.  That little book on the right is my very first Shutterfly book.  I made it in 2004 and it's all about our little fur-baby.  So I had years of practice making baby books before we even had a baby.  Ha!

I've made lots of other products on Shutterfly including cards (invitations, announcements and occasion), address labels, photo prints, wall calenders and of course Christmas cards.  This last year I made my first desk calendar.  This is a photo of the front cover.

Here is the inside.  They have many layout options but as with book pages I suggest that less is more.  I think these make great gifts too.

Hint #7: If you make a wall calendar include birthdays (and anniversaries) of your friends and family and put photos of them on those days.  

This is a perfect way for you and your kids to see who has a special day coming up.

Hint #8: You don't need to wait until January to make a new calendar for you or a gift.  You can make the calendar start anytime.

If you haven't checked out Shutterfly you should. :)  

Sunday, August 19, 2012

Mushroom and Barley Soup Recipe

This is a Pinterest recipe that required a few adjustments at then end.  I found the original recipe here at shape.com (perhaps that should have been a clue as to what was to come).  When it was finished my husband and I tasted it and thought it was blah.  He said it tasted like stock.  I thought it tasted like stock and barley water.  Yummy.  Not so much.  So we started adding things to it to find some flavor.  I added minced garlic (that I quickly sauteed to cook, next time I'd just add it with the onions and carrots).  He added dried onion flakes.  I added more salt.  He added more salt.  I added a bit of fresh chopped basil.  Then it had flavor and we were able to eat. :)  I tasted even better the next day as leftovers, perhaps b/c the flavors could marinate more.


Mushroom and Barley Soup
Ingredients
2 tbsp. olive oil
1 yellow onion, chopped
3 carrots, peeled and chopped
3 c. mushrooms (1 8oz package), sliced
3 cans vegetable broth
1 c. barley, cooked
3-4 cloves garlic, minced or chopped
Salt and pepper to taste
*dried onion flakes
*chopped fresh basil leaves

Directions
Heat the olive oil in a pot over medium heat. Add onion, garlic and carrots, cooking until soft. Add mushrooms and cook until soft. Then add vegetable broth and barley, simmering for 10 minutes. Stir until mixture is blended. Add salt and pepper to taste.  Feel free to add other favorite spices, let me know what you use!

Friday, August 17, 2012

Fisher Price Friday - Play Family Sesame Street

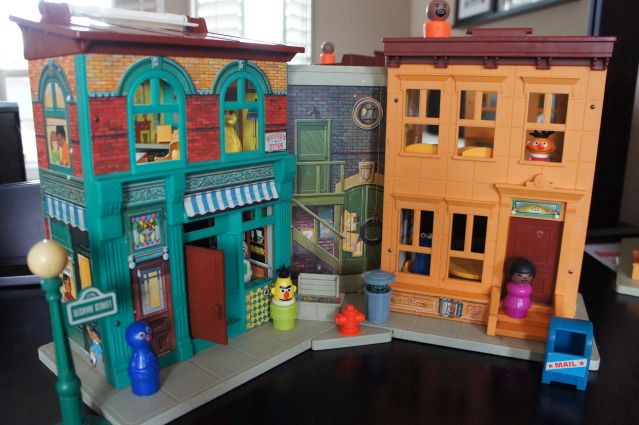
This week on Fisher Price Friday I'd love to show you the Play Family Sesame Street #938.  This set was made between 1975-1978 and has quite a few pieces including 8 Sesame Street little people!  It was also the very first Fisher Price Little People (FPLP) set to be made entirely of plastic.


Sometimes referred to as the Sesame Street Apartments, this set has 4 interior rooms.  It has a living room, bedroom, kitchen and store.  Each side has it's own entrance and the buildings are  connected by a chalk board center.  That way kids can play and learn, very Sesame Street.  

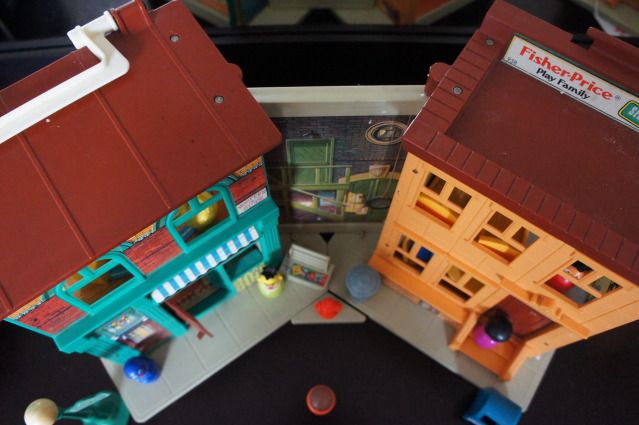
The top of the set has a white handle that connects with the other side when closed for easy carrying.  Well, as easy as can be considering it's a big set that's on the heavy side.  This isn't one for the littlest kids to carry around.  Each side has a different styled roof.  The "brownstone" has a flat top with brick edge and the other a slanted smooth top.

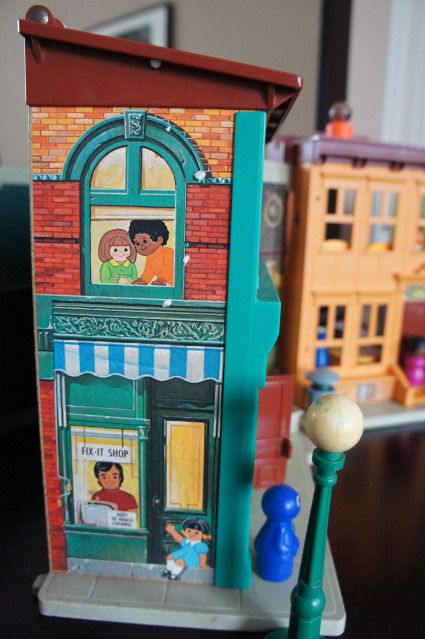
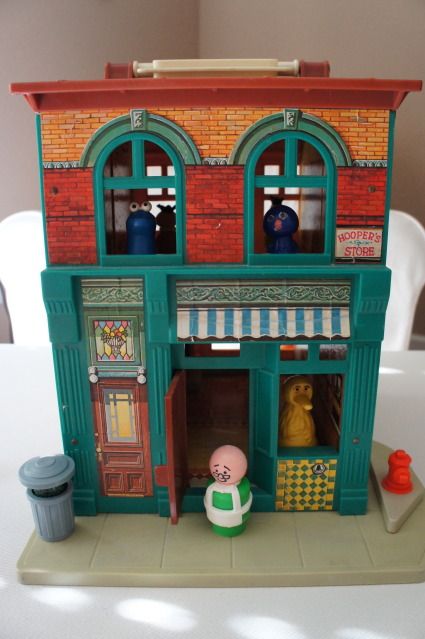
The lithographs on this set are quite impressive.  There are stickers everywhere and they are so detailed with familiar views of the "real" Sesame Street.  I have so many photos to show you! :)  This first one is of the right side of the playset when it is closed.  You can see kids peeking out from the second story window.  Below them is a man looking out of a Fix-It shop window.  The other side has Big Bird's mailbox and familiar doors.

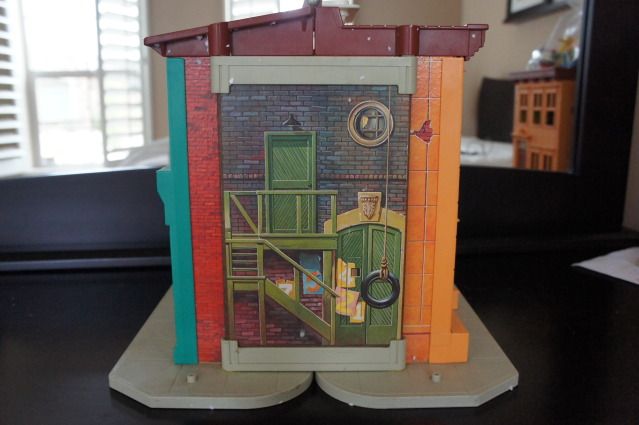
The left side when closed has the tire swing, back entrance, fire escape and exposed brick.  Even a bit of brick showing through the facade.

This area is covered when the set is closed and it has a colorful and vivid "painting" on the brick wall of a sun, bird and a blue doorway covered in ivy.  Bert is hanging out on one of the little pegs that stick out of the base.  I'm assuming they are for characters to sit on, but I don't know for sure.

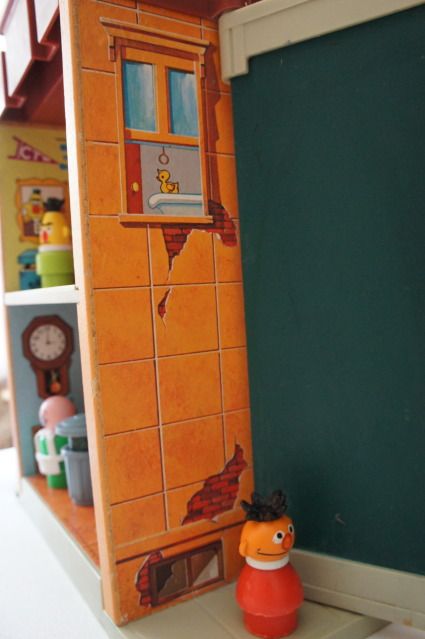
The opposite side has Bert & Ernie's open bathroom window which shows his ducky sitting on top of the bathtub.  The brick peeking through and the basement window are nice touches.


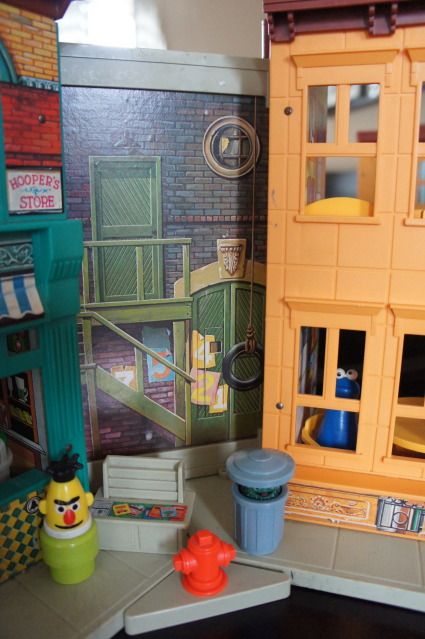
The fire hydrant corner piece is exclusive to this set and is designed to fit in the corner when the set is open.  You can also see the newsstand, Oscar and Bert.  The newstand is another exclusive (and movable) piece, it has a lithograph of magazines and newspapers.  There is also a blue mailbox (seen in the first photo on the right) that says "Mail" across the front.  That makes it different from the other plain (sticker free) blue mailboxes in different FPLP sets.

The light post can stand anywhere and is an exclusive item.  It says "Sesame Street" on the other side.

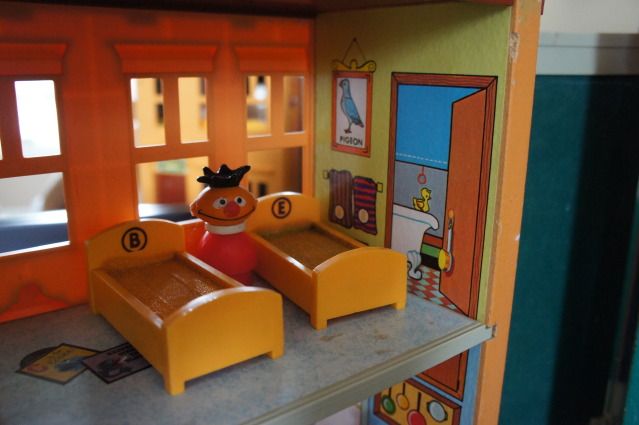
Now lets go inside.  This is Bert and Ernie's bedroom/apartment.  It has a lithograph of their bathroom complete with claw tub and yellow ducky of course.  Also the scrub brush hanging on the door knob.  Adorable!  There is a painting of a pigeon for Bert as well as his and his towels hanging on a towel rack.  The set came with two personalized twin beds that could be yellow, orange or brown (same for all of the furniture in the house).

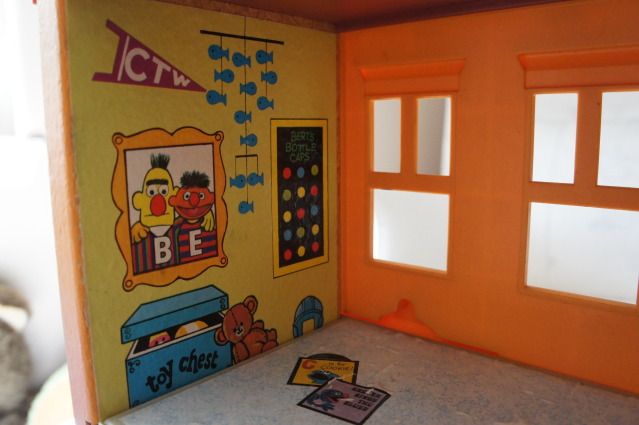
The other wall in Bert and Ernie's bedroom has a whimsical fish mobile (not the only FPLP set to have this mobile, the nursery school #929 had one like it too), toy chest and Bert's bottle cap collection.  Also a helmet, brown bear and a lovely photo of Bert and Ernie.  The CTW stands for "Children's Television Workshop".  Finally, the "linoleum" colored floor has two records on it "C is for Cookie" and "Grover Sings the Blues".  So detailed!

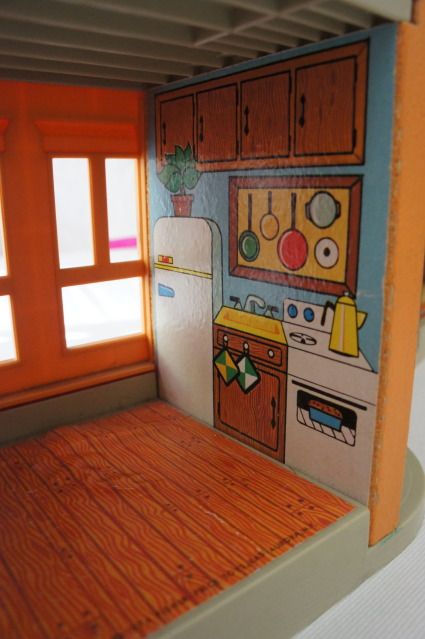
The first floor has Bert and Ernie's kitchen.  There are lithographs of a wood floor and one wall has a full kitchen.  There is a plant on the refrigerator, pot holders hanging below the sink, a pie in the oven and a coffee pot on the stove.  

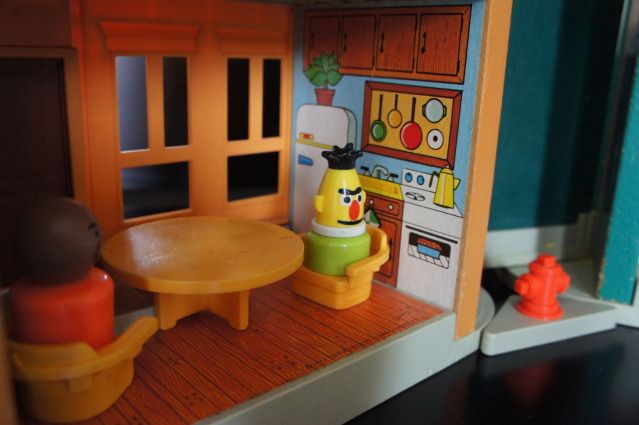
The set came with a round table and two captain's chairs.  However, this isn't the original table.  The table should have a lithograph of two place settings and a pork chop platter.  The kitchen furniture should be the same color as the living room furniture (which should be a different color than the bedroom).

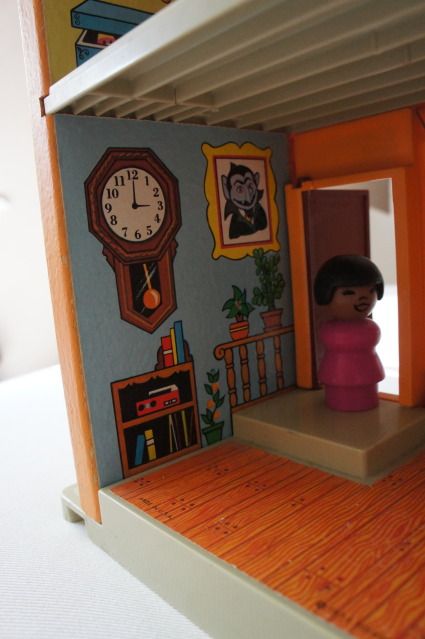
The opposite side of the kitchen has the front door and a step into the room.  The wall has a clock, painting of the Count, potted plants, and a bookshelf complete with record player and books.

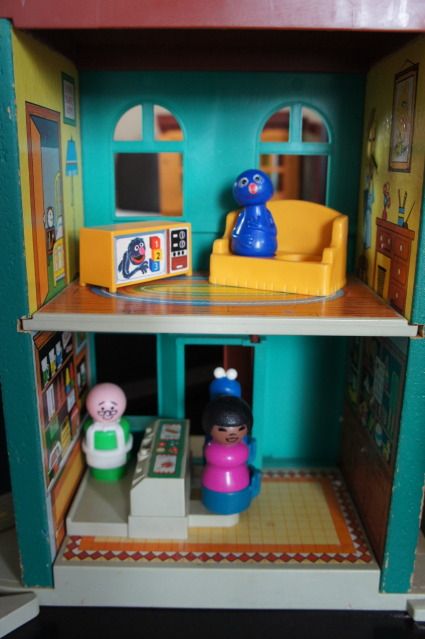
Now to the other side of the set, the living room and Mr. Hooper's store.

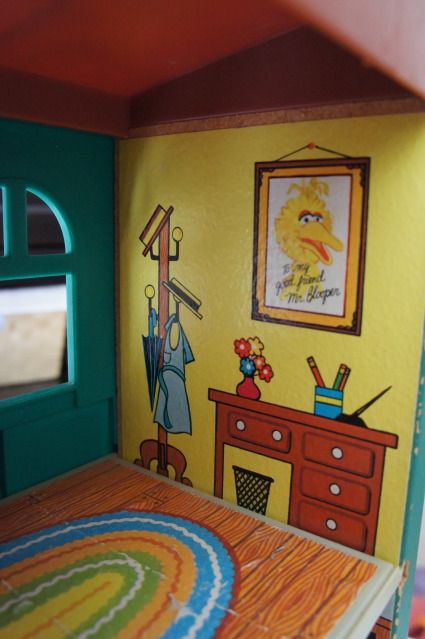
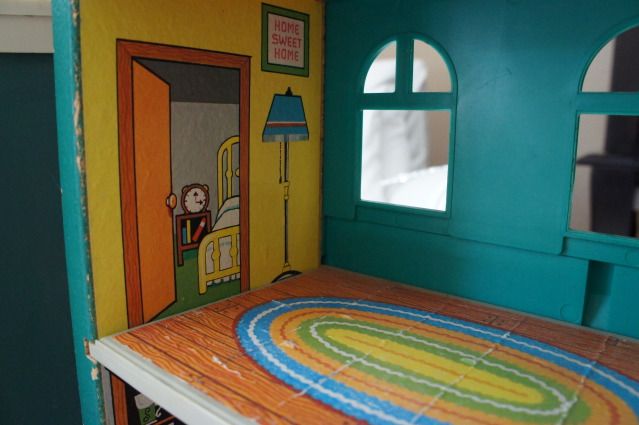
The living room is upstairs and it belongs to Mr Hooper.  It has wood floors and a big area rug.  The wall shows a desk with wastebasket, flowers and pencil cup.  There is a coat hanger that's full with his straw hats, shop apron and an umbrella.  There is a painting on the wall of Big Bird that's signed "To my good friend Mr Hooper".

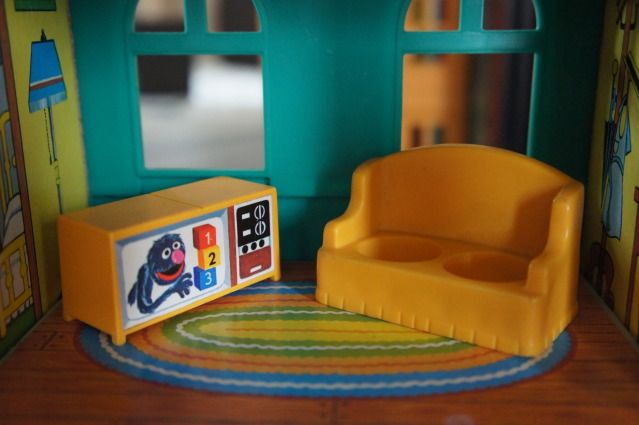
Mr Hooper can relax in his two seater couch while watching Sesame Street on his television.  He should also have a coffee table.  The furniture could be brown, gold or orange.

This is the view of Mr Hooper's bedroom.  It has a brass bed, night stand with books, alarm clock and green carpet.  The wall in the living room has a floor lamp and "Home Sweet Home" painting.  Too bad there wasn't a Mrs. Hooper.

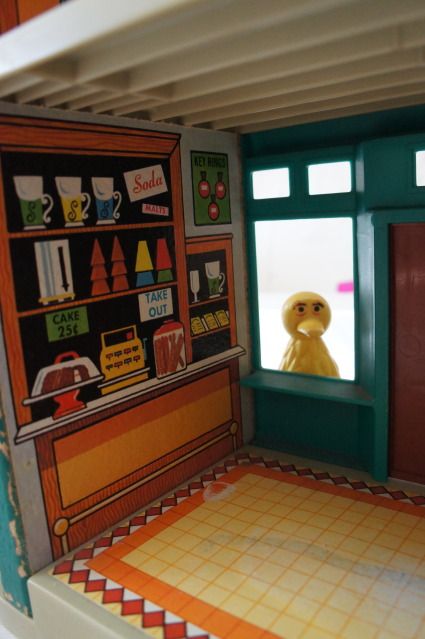
On the first floor is Mr Hooper's store.  The set came with this lunch counter.  It has two blue seats on one side and a flat area for Mr. Hooper to stand on the other.  The top has a lithograph of two meal place settings.

Here is a better view of the wall behind the counter.  I love how creepy Big Bird looks peeking through the window. :)  The wall has lots of items including a cake, ice-cream cones and cups a cash register and a sign advertising key rings.  The floor is a square and diagonal linoleum pattern.  

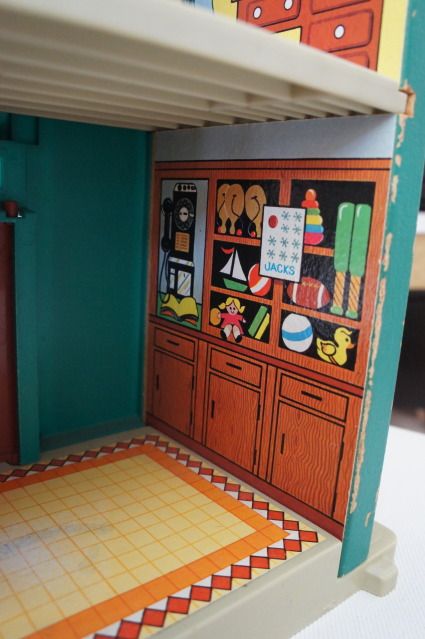
The opposite side of the store has a wall with books, balls, boats and other toys to sell.  There is also a pay phone and a open phone book.

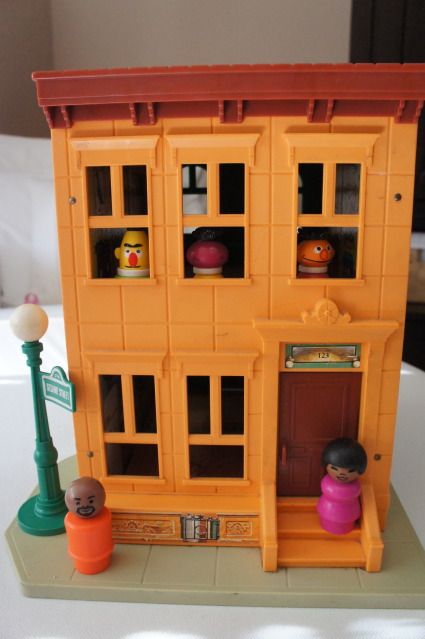
Now to the outside.  The brownstone has the address "123" over the door.  There are lithographs on the base showing a grate.  The side of the building is detailed with trim over the windows, edges on the hand rails of the stoop and decorative touches on the roof.  Does it feel like Sesame Street to you?

Mr. Hooper's store has a brown door and no steps.  He has a window where he can serve customers out the front.  The lithographs include a blue and white store canopy, two tone brick upstairs, door with leaded glass windows next door and of course a Hooper's Store sign.  Isn't it impressive?  So much architectural detail on this one.  I doubt kids could appreciate it as much as us grownups.  

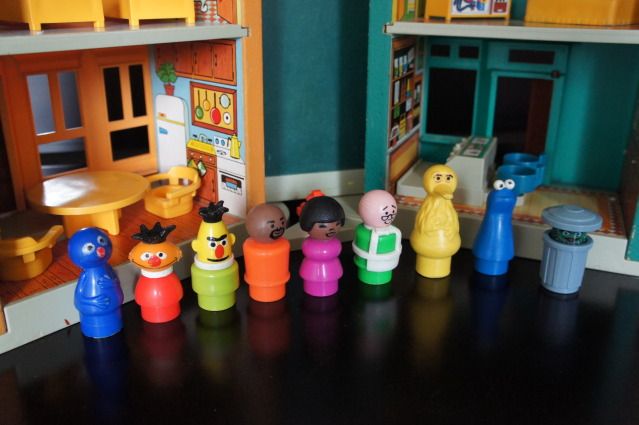
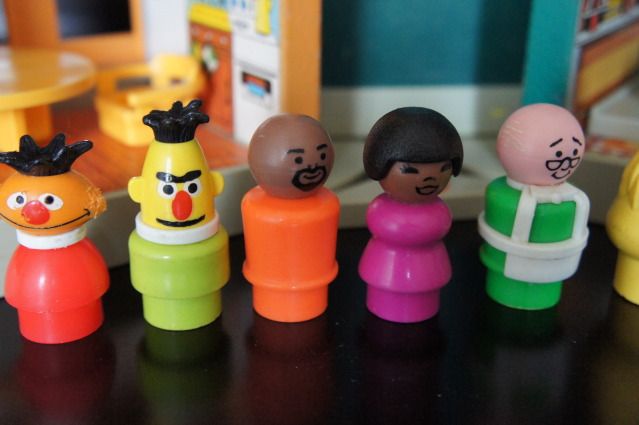
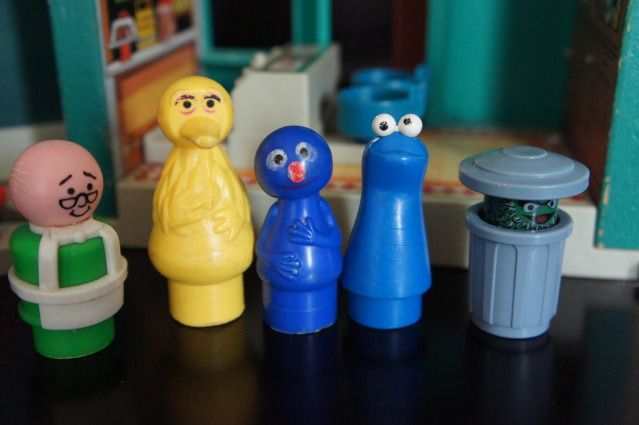
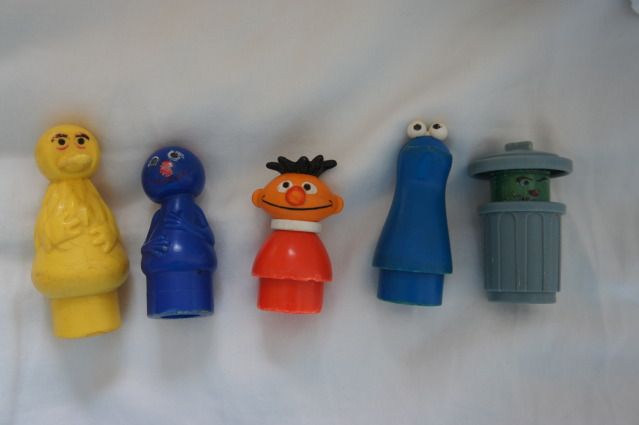
Last but not least are the people.  From left to right we have: Grover, Ernie, Bert, Gordon, Susan, Mr. Hooper, Big Bird, Cookie Monster and Oscar.  The original set came with all of these figures except Grover.  He came in a separate Sesame Street figures pack (and there are more of them, did you see Roosevelt Franklin looking out of one of the windows in a prior photo?).  All of these pieces are plastic.  Big Bird should have a brown nest to sit in but I don't have one.


The Oscar pictured here is the newer version (1976+) because his trash can does not have a lid.

The Oscar pictured here has a lid, so he was made before 1976.  I'm getting these people ready to sell in my Etsy store.

Now that you've seen it all let me tell you what is missing (besides what I mentioned before).  The green garbage truck that says "Sesame Street Sanitation" on the side.  I used to have one, it is pictured here with the Clubhouse #927 photos.  Also the white 6 rung ladder.  Not to be confused with the 5 run ladder that goes with the A-Frame (although they look very similar).  The set also came with a box of white chalk and a yellow eraser.  

Whew, that was a lot of photos.  I think I showed you every inch of that set!  I hope you enjoyed your visit to Sesame Street.  Is anyone else humming the Sesame Street theme song right now?  I know I am.
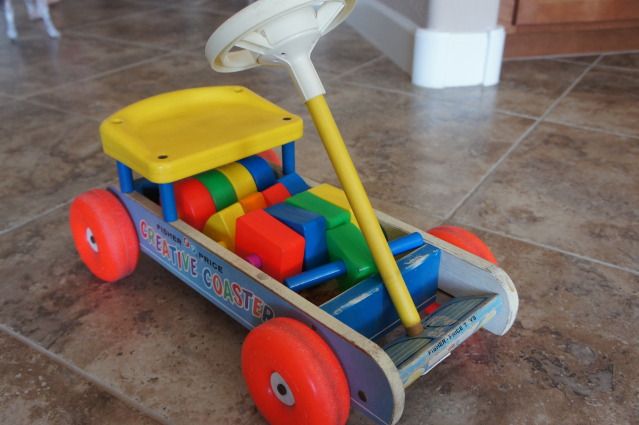
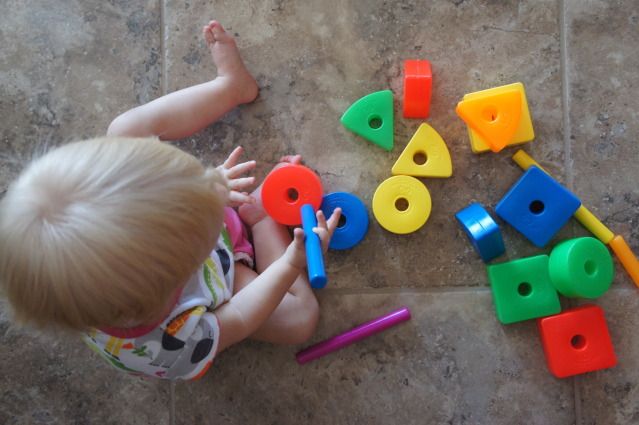