HomeVintage Fisher PriceMy Etsy ShopCategoriesAbout

Wednesday, April 30, 2014

The dangers of momma-twerking.

I recently started doing Zumba and am learning to twerk and other somewhat unflattering moves that feel oh-so-wrong for a 30'ish year old mother of 2 to do. ;)

someecards.com - Watch out! Momma is practicing her twerking again.

I found this video on FB this morning and it is perfect.  This could totally happen at my house.  Watch out baby girl!


Monday, April 28, 2014

Baked Buttery Bread Crumb Cod Recipe

Hey, it's fishmonger monday! ;) This recipe is so easy and delicious that I had to share it with you.  I've got to say that you can't go wrong with buttery breadcrumbs am I right?  It can be used with any white fish if you don't have cod on hand.  


This recipe was a winner and I served it with other oven baked side-dishes including my Baked Zucchini Sticks and Baked Parmesan Mushrooms.

Baked Buttery Bread Crumb Cod
1 1/2 pound Cod (or other white fish)
1/2 cup Bread Crumbs 
2 tablespoons Stick Butter 
Salt and Pepper to Taste 
Olive Oil  

Directions
1. Preheat oven to 400 degrees. Remove skin from fish. Sprinkle fish with salt and pepper (to taste) and place in baking dish with a little olive oil. 
2. Melt butter in a medium sized bowl in microwave.  Combine bread crumbs with butter until well-coated and spoon crumb mixture over top of fish. Cover the top of the fish evenly or make a big pile if you want, but the top part may get more toasty (see my photo below). 
3. Bake in oven for 20 minutes if about 1" thick; 30 minutes if 1 1/2" thick. Fish should flake with a fork. 


Mmmm, I'm getting hungry just thinking about this recipe.  The photo doesn't do it justice, trust me it was GOOD! :)

Other Favorite Fish Recipes

(yes, I love butter!!)

Friday, April 25, 2014

Fisher Price Friday - Happy Birthday

Today just happens to be my birthday so today on Fisher Price Friday I'm taking a little break.  But I don't want to leave you out of the fun so I'll share some of my favorite Fisher Price birthday items. :)

First up the sweet vintage book, Timmy's Birthday Party.  The book is a sticker book and story, a two-in-one!  For more information on Timmy's Birthday Party go here for my original post.


Next up the Happy Birthday Pocket Radio #768.  This music box plays the oh-so-familiar tune that is very important on a day like today!  For more information on this music box go here for my original post.


Now, that you're in the birthday mood it's time for Fisher Price themed gifts.  These adorable note cards are made by Etsy shop Petiteschosesdeci with drawings of vintage Fisher Price little people and toys.  She makes other vintage toys as well, I saw a Happy Apple in her shop today.


She wraps the cards up beautifully with little paper people on top as embellishments.  Now that's a perfect gift for the Fisher Price collector! :)


Last but not least, check out this people pattern mini jotter covered in tiny little people figures from another Etsy seller FBRboulevard.  I LOVE these and have bought some for myself as well as given them as gifts.  

Hope you enjoyed my birthday post as much as I'm enjoying my day! :)

Thursday, April 24, 2014

Crockpot (easy) Brasilian Beans and Rice Recipe


My in laws have lived in Brasil the last 35+ years as missionaries so I've learned a thing or two about making Brasilian beans and rice.  I've already shared the family Brasilian Beans recipe but today I'd like to share a easier crockpot version.  My sister-in-law helped me create this version last time she and her (Brasilian) husband visited.  

Basically I combined the ease of my slow cooker beans (the ones I cook ahead then freeze for recipes) and my other Brasilian bean recipe.  Same with the rice.  We took the Brasilian rice ingredients (onion, garlic, oil) and used the ease of a rice cooker.  Ah, a perfect marriage of Brasil and USA!

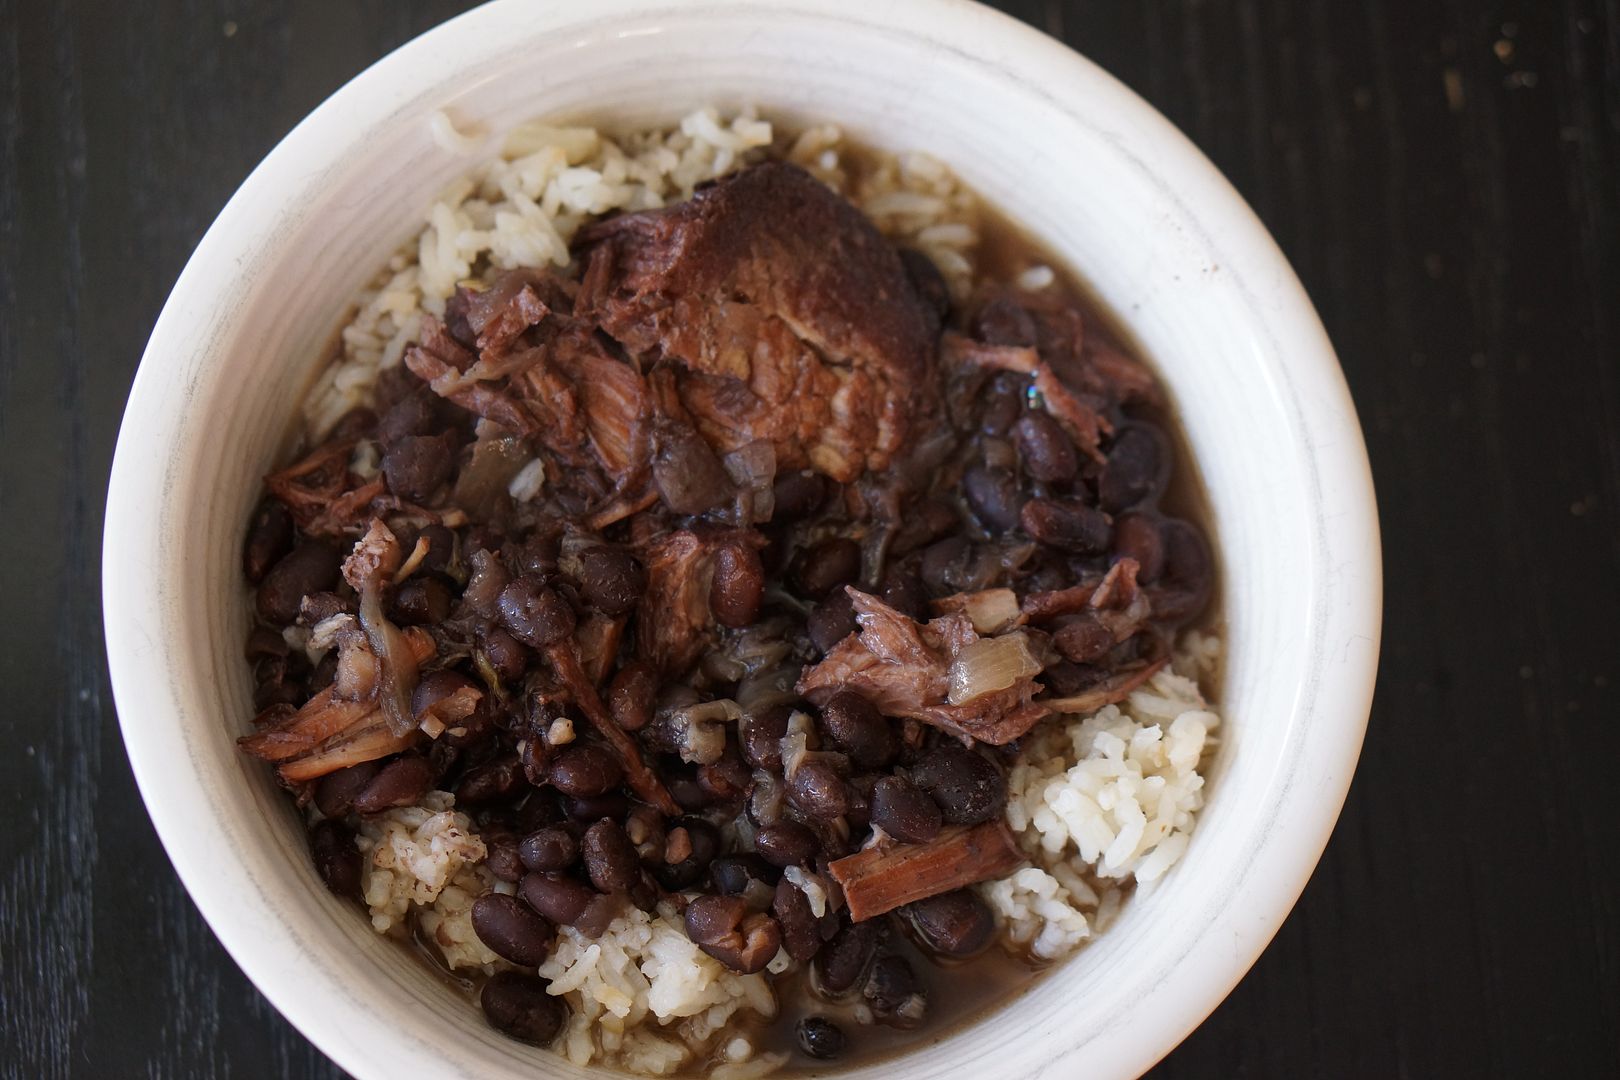
It is absolutely fabulous and my entire family LOVES it.  My version is not spicy but full of flavor.  It works well as leftovers although we separate the bean "juice" from the beans so that they don't soak up and get smooshy in the refrigerator.

Crockpot Brasilian Beans
Ingredients
1-2 lbs pork (w/bone).  You can also use steak or sausage, I used 2 pork chops.
1 lb dried black beans
1 onion, diced
3-5 garlic cloves, diced
1 Tbsp salt
1 1/2 tsp pepper
2-3 Tbsp olive oil
8 cups of water

Directions
1. Measure out the beans and remove any stones.  Give them a quick rinse and then add to the crockpot.  Add 6 cups of water.
2. Heat medium skillet and add olive oil.  When the olive oil is hot (but not smoking) add the onion and sautee until translucent.  Add the garlic and cook for 1 more minute.  Put the mixture into the crockpot.  
3. Add the meat, salt and pepper and cook on Low for 6-7 hrs.  About an hour before serving add 2 more cups of water if you prefer it more soupy (we do!).  Otherwise leave out the water and for a thicker texture smash some of the beans.
4. Serve over rice.

Brasilian Rice
3 cups white rice (uncooked)
1 onion, chopped
3-5 cloves of garlic, chopped
2-3 Tbsp olive oil
6 cups of water

Directions
1. Heat medium skillet and add olive oil.  When the olive oil is hot (but not smoking) add the onion.  Saute for about 3 minutes then add the rice.  Keep sauteing over medium heat mixing from time to time so that it doesn't burn but gets a nice toasty brown color (like rice-a-roni).  Add the garlic at the end and cook for 1 more minute.
2. You can now either add the water to the pan, cover and cook until the rice is tender (about 20 min) or put the rice mixture and water in a rice cooker.  I prefer the rice cooker!
3. Serve with Brasilian beans.

Wednesday, April 23, 2014

(semi) Wordless Wednesday - Cereal Sorter

Saw my sweet 2 year old doing this the other morning.

Can't blame her, I used to do the same thing.  Ah marshmallows!  ;)

Tuesday, April 22, 2014

Beet Green Fruit Smoothie


Happy Earth Day!  Today we celebrated Earth Day by riding the bike to the park instead of driving the van.  It was 95 degrees on the way back home but still worth it.


Today seemed like a perfect day to share a new smoothie recipe with you!  I recently discovered a way to use the tops of beets, also known as Beet Greens.  I regularly receive beets in my CSA box and would usually cut off the greens and toss them.  To me they were the same as the tops of carrots.  

One day on a whim I googled "what to do with beet greens" and saw so many options!  Who knew? ;)  I decided to give the smoothie idea a whirl.  

Beet greens are easy to prepare.  You cut them from the beets, rinse, dry and slice into small ribbons or pieces.  The smaller the pieces the easier they are to store in the freezer and remove later.  Then place into a freezer bag and they'll be waiting for you the next time you make a smoothie.

Beet greens can be used in smoothies in place (or in addition to) spinach and kale.  They have very similar nutrients as spinach but with a slightly milder taste.  Basically you can't taste them unless you put a lot in.

Here is a recipe I made just this morning:

Beet Green Fruit Smoothie
2/3 cup beet greens (mine were frozen)
1 banana
1 orange (peeled)
1.5 cup fresh strawberries (keep the stems on)
2/3 cup frozen cherries (or any other frozen berry)
8 oz crushed ice
*optional 4 oz almond milk

Directions
Using a Vitamix (or other blender) start blending on 1 and move up to 10, then blend on high for about 20 seconds or until the consistency you prefer.  


So yummy!  Next time you have beets don't toss the greens, use them!

More Smoothie Recipes

Berry Banana Chia Smoothie
Chia Pineapple Banana Smoothie
Glowing Green Smoothie
Shamrock Kale and Fruit Smoothie

Friday, April 18, 2014

Fisher Price Friday - Small World


Warning, today's post will cause It's a Small World to be stuck in your head. ;)  Yes, today I'm showing you the Pocket Radio Music Box Small World #746.  Small World was made from 1977-1978 and plays the oh-so-familiar song "Small World".  You know, the song that plays on the Disneyland ride. :)  It's a Small World was created for Disney (first shown at the 1964 New York World's Fair) but the familiar tune is found all over the place from ice-cream trucks to this vintage toy!

The pocket radio, like other FP pocket radios is made with a wood box, plastic front, plastic dial and a vinyl carrying strap.  The wood back and sides are covered with lithographs.


The bottom of the radio has the toy number #746 as well as the FP information.  This particular radio has movement from Japan.

The back of the radio has those oh-so-familiar words:

It's a world of laughter,
a world of tears;
It's a world of hopes
and a world of fears.
There's so much
that we share
that it's time
we're aware.
It's a small world
after all.

Are you humming it yet?  This puts me in the mood to take a trip to Disneyland. :)

Just like the Disneyland ride as the dial moves around there are pictures of little children from all over the world.

For more music box Fisher Price Toys check out:

Tuesday, April 15, 2014

Kale Soda - Now I've seen Everything.

I was shopping a few weeks back and saw this display. I was so surprised that I pulled out my iPad to take a photo of it.  Kale soda?  What?

Then last week I was back at the store and decided on a whim to pick up a can to give it a try.  The craziness of a kale flavored soda called to me. ;)


It looks like a regular Hansen's soda (no dye) and had the same type of ingredients (carbonated water, sugar, citric acid and natural flavors).

So what did I think?

It was surprisingly good.  Very much like a sprite/ginger ale type of soda but with a distinctive green flavor.

My husband's reaction after taking a sip of my soda (not knowing it was kale).

"Sugary earth".

He also made a lovely grimicing face. :)

Will I buy it again?  Probably not.  It has absolutely none of the super health benefits of Kale, just a little flavor.  

However, if it was the only natural soda flavor available I'd chose it over say a Coke or Dr Pibb (that stuff will kill you).

For now I think I'll stick with my Kale smoothies.

Friday, April 11, 2014

Fisher Price Friday - Magnetic Chug-Chug Train

My family has a thing for toy trains.  They seem to be multiplying in my house one car at a time. ;)  Our most recent arrival is this very well loved Magnetic Chug-Chug Train #168.  You'll have to use your imagination a bit with this one as it is quite worn out and missing a few lithographs.  Fortunately in this condition despite its' age I won't mind my girls playing with it!


The Magnetic Chug-Chug Train was made from 1964-1969 and has a very familiar looking engine as it's the same size as the Smokie Engine #642 and Toot Toot #643.  However this engine comes with a caboose and a "gondola car" (looks like a flat car).  

The engine has a wood body, wheels and smokestack and the rest is plastic.  It is pulled by a yellow plastic cord and makes a "chug-chug" type sound when pulled.

The lithograph is the same on both sides of the engine with the words "CHUG-CHUG" and there is a FP logo on top.
  
Unlike later trains the pieces stay together with magnets couplers rather than hooking together.

The middle gondola car has a lithograph inside with the words "blue attaches to yellow" on each side.  This is a handy way to show how the magnet coupling works.  Each side of the gondola should have a lithograph that said "Fisher Price Chug Chug" as well as little pictures of the magnets. 

The gondola wheels are yellow and made of wood (as are all the train wheels).

 
The caboose is my favorite part of the train.  It has a white wooden roof with a spring on top that has a wooden bead on the end.  The brown platform holds a little wooden man that is permanently attached.  He moves back and forth when you pull the train.  I will say that he is mighty attractive to my 2 year old, she keeps asking me to take him off. :)

The caboose has a lithograph on the body of a window on each side and has the toy number and FP logo on the side that attaches to the gondola.  

It's a sweet little train and we'll continue to make sure it's well-loved.  Heck, she's dropped it at least twice since it joined our family. :)

For more trains check out:

Tuesday, April 8, 2014

Baked Zucchini Sticks Recipe

I am a fan of zucchini and serve it all the time.  I was raised to eat it sliced, steamed and then salted.  My family however does not appreciate it quite as much as me.  As a result I've tried different ways to prepare it including roasted, baked, stuffed, in stew, soups and even as "chips".  Today's recipe topped them all according to my 6 year old.  She coudn't get enough and neither could I!

I think this one will be in our regular meal rotation!  This recipe is very similar to my zucchini chips, but there is something about having a stick/fry to hold on to that makes this one even better.  Perhaps because it is easier to dip?  I also found it easier to make than the chips because the sticks balance and fit on the rack better. 


Baked Zucchini Sticks
Ingredients
1 lb of zucchini
1/4 cup flour
1/8 tsp salt
1 cup bread crumbs
1/4 cup grated parmesan cheese
1 Tbsp Italian Seasoning
1 large egg

Directions
1. Rinse and dry the zucchini.  Cut off each of the ends and then slice into sticks.  Try to make the sticks equal so they cook evenly.
2. Place the sticks into a large zip lock bag and add the flour and salt.  Shake the bag to coat the sticks completely.  In a wide, shallow bowl combine the bread crumbs, parmesan and italian seasonings.  In another wide bowl wisk the egg with a little water (about 1 tsp) until smooth.
3. Preheat your oven to 425 degrees.  Cover a baking sheet with foil and place 1 or 2 cooling racks on top of it.  Or if you have a convection oven use the elevated rack (that's what I did).  
4. Take one zucchini stick at a time out of the flour bag and dip it in the egg mixture (all sides), then into the parmesan/bread mixture.  Carefully place it onto the rack and repeat for the rest of the sticks.  Do not stack the sticks on each other as the air moving all around them is what makes them crispy and wonderful.
5. Once your rack is full bake for approximately 15-30 minutes until they are a medium brown color and to your desired level of crispiness.  

Serve alone or with your favorite dip such as ranch or marinara.  I made a quick tomato dip by cooking diced tomatoes (the canned kind), adding italian seasoning and blending with an immersion blender.  Easy-peasy!

Note: They're not crispy as leftovers but I still found them to be very yummy. 

For more Recipes that use Zucchini check out:

Vegetable Quinoa Soup
Spring Vegetable Beef Stew
Roasted Zucchini, Onions and Mushrooms
Baked Eggplant and Zucchini Parmesan
Quinoa Stuffed Zucchini Boats
Zucchini Chips 
Zucchini Tomato and Parmesan Bake

Friday, April 4, 2014

Fisher Price Friday - Baby's First Blocks


This sweet baby toy was not my Toddler's first blocks, but they are her current favorite!  Baby's First Blocks #414 is a baby toy designed for kids age 6mo - 2 years and was made from 1977-1988.  All of the pieces are plastic and very durable.  The set was redesigned in 1989 and switched to #1024/#71024 but at closer inspection the container and blocks changed quite a bit.


The set came with a drum with removable blue lid and 12 plastic blocks.  The blocks came in blue, red, green and yellow.  They are in three shapes: circle, square and rectangle.  Most of the blocks are exclusive to this set except the red circle and blue square (#412 Shape Sorter & #1008 Toddler Kitchen).  As well as the yellow rectangle (#412 Shape Sorter)

The blocks can stack on themselves to make towers or be placed in the bucket through the correct shaped cutouts.  My daughter likes to take turns with me putting them inside.  Both of my girls like to use this as a tub toy!  Since there are no lithographs or holes for water to get inside (the blocks) it's perfect!


For more baby toys check out:

And for more block fun: