HomeVintage Fisher PriceMy Etsy ShopCategoriesAbout

Thursday, May 31, 2012

Summer Squash and Green Chard Gratin

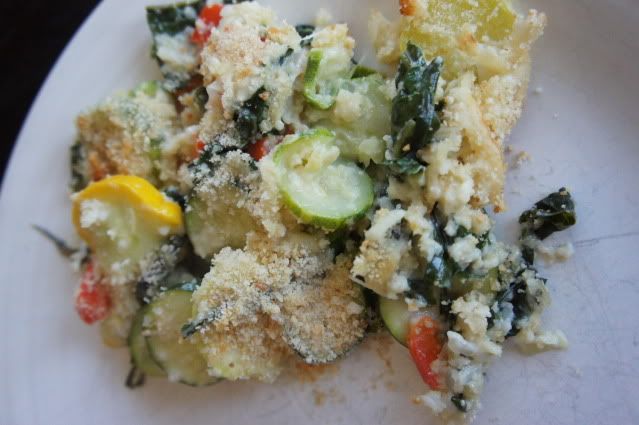
This week's CSA box from Chow Locally had zucchini and other summer squash, green chard and spring onions.  They included a recipe for Zucchini and Squash Chard and I decided to add a few more veggies.  It is a surprisingly light tasting recipe despite the heavy cream mixed in. ;)

Summer Squash and Green Chard Gratin

Ingredients
2-3 Tbsp butter
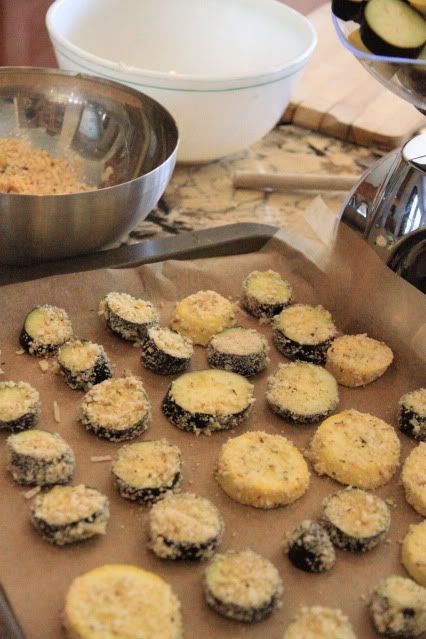
2 medium zucchini, sliced into coins about 1/4 inch thick
2 medium yellow or other squash, sliced into coins about 1/4 inch thick
2-3 chard leaves (ribs removed and sliced into thin ribbons)
1 red pepper (I used half) - diced
2 spring onions, minced
3 garlic cloves, minced
salt and pepper
3/4 cup heavy cream or almond milk
1 cup bread crumbs
3/4 cup grated Parmesan cheese

Directions
1. Preheat oven to 450.  In a large skillet melt butter over medium heat.  Add zucchini, squash, spring onions, chard, red pepper and garlic.  Season with salt and pepper.  Cook, stirring occasionally until zucchini and squash are crisp tender, about 6 minutes.
2. Add cream or milk and cook until thickened, about 5 minutes.  Remove skillet from heat, stir in 1/2 cup bread crumbs and 1/4 cup Parmesan.
3. Spoon mixture into a shallow 2 1/2 quart baking dish.  Sprinkle with remaining bread crumbs and Parmesan.  Season with salt and pepper.  Bake until top is golden, 8 to 10 minutes.

This recipe got a big thumbs up from my family and it tasted just as great the next day as leftovers.  We will be making this one again.  Perhaps often now that we're in prime summer squash season!

Wednesday, May 30, 2012

Wordless Wednesday - Sedona

Sedona is lovely in the spring.

Lots of colorful things to see.


Even a coyote wandering around.  Can you see him too?

Tuesday, May 29, 2012

Buttermilk Ice Cream

My search for yummy ice-cream recipes continues.  I started by making vanilla ice-cream that tastes just like Haagen Dazs.  I also made my husband some vanilla ice-milk (no cream, just milk) which he is enjoying.  I decided to be adventurous this time around and make a buttermilk flavored ice-cream.  I usually have fresh buttermilk in my refrigerator since I use it to make my famous Buttermilk Ranch Dressing and also Buttermilk Pancakes.


I don't remember having buttermilk ice-cream before but the description sounded so great (a creamy ice-cream that tastes a bit like cheesecake and lemon) I had to give it a try.  I looked at a few different recipes but ended up using the recipe from about.com.  I love that it only has 4 ingredients.


Buttermilk Ice-Cream

Ingredients
1 cup heavy cream
6 egg yolks
3/4 cup sugar
2 cups buttermilk

Directions

1. Bring cream to a boil in a small sauce pan.  Meanwhile, in a medium bowl whisk the egg yolks and sugar together until pale yellow and thick.
2. When cream boils slowly pour it into the egg mixture, whisking constantly (so you don't cook the eggs).  Return mixture to pan and cook, stirring constantly over medium-low heat until thick enough to coat the back of a spoon.
3. Pour mixture into a clean bowl and stir in buttermilk.  Cover and refrigerate until chilled (about an hour up to overnight).
4. Freeze in an ice-cream maker.

This rich and creamy ice-cream is perfect with fresh berries.  Enjoy!


Monday, May 28, 2012

Pioneer Village - Anthem

We had some unseasonably cool weather this weekend (70's instead of 100's) so we took advantage of it Saturday by checking out the Pioneer Village in Anthem. It's a living museum full of historical or made-to-look-historical buildings. For only $7 (used a entertainment coupon) the whole family enjoyed 90 min of exploring. We'll need to go back again because that wasn't enough time to see it all. Fortunately summer rates of only $4 per person (under 5 are free) start May 30th.    

They have buildings, wagons and other old equipment and vehicles.

My daughter looked like this most of the time, peeking inside to get a good look.  My husband took some amazing family photos of the kids on porches like this and beside buildings.  It is a great location for photography.  

Many of the interiors had time-period appropriate furniture, furnishings and decorations.


I've always loved to photograph old doors and doorknobs.  Pioneer Village had many many to look at.  Unfortunately I was wearing my baby most of the time and I will admit that it is a challenge to photograph anything up close when you're wearing a baby!  Hopefully next time out I'll get more.

This hall was moved here and rebuilt brick by brick!

The authentic pioneer schoolhouse.

Pioneer Village is open year round, even when it's hot hot.  I saw on their website that it only costs $1 a person to get in if it's over 100 degrees that day.  Now that would be an adventure.

Our weekend fun continued the next day with a last-minute trip up to Sedona.  It is beautiful up here and I'll be blogging about our trip when I return.  We saw lovely red rocks of course but I also picked up some lovely rocks aka-new-jewelry.  :)

Saturday, May 26, 2012

Quinoa Arugula Salad with pecans


Doesn't this look delicious?  It's a quinoa arugula salad that I threw together.  We got a big bunch of fresh arugula in last week's CSA box.  The leaves are a bit spicy on their own, but mixed with the toasted pecans, feta and quinoa they are just right.

Quinoa Arugula Salad

Ingredients
1.5 cups quinoa, dry
3 cups arugula, roughly chopped and loosely packed
1/2 cup cherry tomatoes, quartered
half a red onion, diced
1 cup chopped pecan pieces
lime juice (fresh or concentrate)
olive oil
Feta

Directions
1. Preheat the oven to 350 degrees.  Toast the quinoa and pecan pieces in separate pans for 5 minutes, be careful that they don't burn.  While the quinoa is cooking prepare the water on the stove.  Add 1.5 cups of water for every 1 cup of quinoa so it's 2 1/4 cups of water for our recipe.  After it is toasted add the quinoa to the boiling water and cover with a lid (slightly open for steam to escape).  Keep simmering on medium-low and cook for 15-20 minutes or until the water is gone.  Remove from heat, take off the lid and allow to cool 5-10 minutes. 

2. In a large bowl toss the cooked quinoa, arugula, tomatoes, red onion, toasted pecans and feta cheese together (although we kept the nuts out so people could add their own).  Drizzle olive oil and lime juice over individual servings to taste.

We all ate this salad although some of us (the 4 year old) added quite a bit of feta.  I personally added a lot of pecans, my favorite part!  My husband put some leftover pita chip crumbs (from the swiss chard tzatziki recipe) on his which he preferred to the pecans.

Friday, May 25, 2012

Fisher Price Fridays - Cash Register


Time to do a little shopping, Fisher Price style.  Today on Fisher Price Fridays it's the Cash Register #926.  This cash register was created between 1974-1990, made after the wood version #972.  This updated version is all plastic with plastic coins.  It came with 6 coins, two of each color (yellow, red and blue).  I think that I have version B926B (dated 1974) because I am missing the large lithograph in the back.  The original version had a litho of children picking apples from a tree.  Along the bottom is a lithograph of the numbers 1 thru 10 in different colors.

There are three slots in the top to fit the different coins.  There are two buttons on the top.  When you press the red "Change" button a coin drops down the side.  When you press the green "sale" button the coins drops into the drawer (and a green "sale" shows in the box).  

There is a green crank on the side that opens the drawer and makes the bell ring.  The lithograph on this side is a woodgrain design with a squirrel holding a 10 cent coin.  There are 5 and 25 cent coins on each side of him.

On the left side there is a orange coin return ramp.  The woodgrain lithograph includes two squirrels, each one holding a coin.

The front of the register has a green drawer, brown coin shelf and three coin buttons.  The 5 cent coin shows a green balloon.  The 10 cent is a red apple and the 25 cent a vanilla ice-cream cone.  Such a colorful toy!  My daughter loves to play store using the cash register.  It's a sweet little toy.


Thursday, May 24, 2012

Swiss Chard Tzatziki

This week's CSA included a bunch of pink swiss chard.  I decided we needed to try a new way to eat it this time and found this tzatziki recipe.  I've never made a tzatziki recipe before, but it looked like something we would enjoy.  What's not to love about a dip?  Sure enough, it was a hit with me and the 4 year old.  The husband didn't love it but you can't win them all. :)

Coincidentally a friend of mine made the same exact recipe last night too.  She served hers with potato latkes so if that sounds good to you check out her recipe here.


Swiss Chard Tzatziki from Martha Stewart
Ingredients
1 cup Swiss Chard, stemmed and finely chopped (about 3 leaves)
1 garlic clove
1/4 teaspoon coarse salt
1 cup Greek yogurt (plain)
1 Tbsp virgin olive oil
1 Tbsp fresh lemon juice
1/8 tsp cayenne pepper (I used paprika)
Pita chips (or 2 whole-wheat pitas, cut into wedges and toasted)

Directions
1. Prepare an ice bath; set aside.  Bring a saucepan of water to boil.  Add chard and cook until just tender, about 3-5 minutes.  Drain and immediately plunge into ice bath to stop the cooking.  Drain.
2. Using a mortar and pestle (I used a bowl and a heavy measuring scoop), grind garlic and salt into a paste.  Stir chard, yogurt, garlic paste, oil, lemon juice, and cayenne pepper (or paprika) in a medium bowl.  Serve with pita chips or wedges.  Tzatziki can be refrigerated in an airtight container up to 1 week.  

Wednesday, May 23, 2012

Wordless Wednesday - pool toys

Who says you need fancy pool toys?

We bring empty yogurt, sour cream and kids meal cups.  Add a toy car that someone left by the pool and you're in business.

Reduce-Reuse-Recycle

Tuesday, May 22, 2012

Vanilla Ice Cream Recipe - just like Haagen Dazs

Our new ice-cream maker arrived last weekend.  We christened it by trying out a simple vanilla recipe.  We have been devoted Haagen Dazs ice-cream lovers for awhile now thanks to their simple (non-chemical) ingredients.  Imagine my surprise when this recipe tasted just like Haagen Dazs vanilla!  Of course the ingredients are right on the package, but there are so many ways out there to make vanilla that I was pleased that our first attempt was right on.

Copy-cat Haagen Dazs Vanilla Ice-Cream
Ingredients
4 egg yolks
1 cup milk
1 cup heavy cream
1/2 cup sugar
2 tsp vanilla

Directions
Slowly bring the milk to almost boiling and then remove from heat.  In a medium bowl mix together the egg yolks and sugar until it's thick.  Then pour the mixture into the hot milk slowly while continuously stirring.  After it's mixed, heat on medium until the custard thickens, about 10 minutes.  Be careful that it doesn't boil.  When you see a film on the back of your spoon then you can remove the pan from heat.  Leave to cool.

When the custard base is cool stir in the heavy cream and vanilla, then transfer the mixture to your ice cream maker.  Follow your manufacturer's instructions.

I think this recipe will be a great base for other flavors.  I'm looking forward to experimenting with fruit, pistachio nuts or even coffee.  I can't wait for our next batch!

More Fabulous, Simple and Chemical Free Ice Cream Recipes:

Double Chocolate
Vanilla Bean
Coconut
Sweet Cream
Buttermilk
Luscious Lemon
Chocolate Raspberry Truffle
Key Lime
Chocolate Peanut Butter

Monday, May 21, 2012

Baked Eggplant and Zucchini Parmesan

Last saturday our CSA box included Japanese Eggplant and Zucchini.  We have never cooked with eggplant around here so I spent some time researching.  I decided that a Parmesan was the way to go as it would somewhat hide the vegetable, just in case it was too much for our family to take.  Ha!  After looking at a few different recipes I decided to take one I found here and add zucchini too.  Since I didn't want to use a bottled tomato sauce I made my own.  Let's just say it was a busy afternoon in the kitchen!


Baked Eggplant and Zucchini Parmesan
Ingredients
2 large eggs
3/4 cup dry breadcrumbs
3/4 cup finely grated Parmesan, plus 2 Tbsp for topping
1 tsp dried oregano
1/2 tsp dried basil
Salt and ground pepper
4 Japanese eggplant and 3 yellow zucchini (2 1/2 lbs total), sliced into 1/2 inch rounds
6 cups (48 oz) chunky tomato sauce (store bought or see recipe below)
2 cups shredded mozzarella (8 oz before shredding)

Instructions
1. Preheat oven to 375 degrees.  Brush 2 baking sheets with olive oil (or cover with parchment paper), set aside.  In a wide, shallow bowl, whisk together eggs and 2 Tbsp water.  In another bowl combine breadcrumbs, 3/4 cup Parmesan, oregano, and basil.  Season with salt and pepper.


2. Dip eggplant slices in the egg mixture, let excess drip off then dredge in the breadcrumb mixture coating well.  Place on baking sheets.  Bake until golden brown on bottom, 20-25 minutes.  Turn slices, continue baking until browned on other side, 20 to 25 minutes more.  Remove from oven, raise oven heat to 400 degrees.

3. Spread 2 cups sauce in a 9x13 inch baking dish.  Arrange half the eggplant in dish, cover with 2 cups sauce, then 2/3 cup mozzarella.  Repeat with remaining eggplant, sauce, and mozzarella; sprinkle with 2 Tbsp Parmesan.  Bake until sauce is bubbling and cheese is melted, 15-20 minutes.  Let stand 5 minutes before serving.


Chunky Tomato Sauce (from martha stewart)
Ingredients
1 Tbsp olive oil
1 small onion, diced
2 garlic cloves, minced
2 cans whole tomatoes (28 oz each)
1/4 tsp dried oregano
salt and pepper

Directions
1. In a medium saucepan heat oil over medium heat.  Cook onion and garlic, stirring frequently until translucent, 2 to 4 minutes.  Crush tomatoes into pan, add oregano.  Simmer, stirring occasionally until thickened, about 15 minutes.  Season with salt and pepper.

While I cooked this afternoon my daughter "cooked" too.  She did everything I was doing in her own kitchen, it was quite adorable.  Here she is putting her own parmesan in the oven.

Saturday, May 19, 2012

Brazilian Beans

Today I'd like to share a family recipe with you.  It is my mother-in-law's Brazilian Beans.  I used to make the recipe with Brazilian rice as well, but after changing some of our eating habits we now just put it over steamed brown rice.


This recipe is a staple food eaten in Brazil, and is high in protein and flavor.  You can add whatever type of meat you prefer or have on hand.  In the past we've used pork but this time I used beef.  You can also use whatever type of (dried) beans you have lying around.  
Brazilian Beans
Ingredients
1 lb beans (pinto, black, etc)
1 Tbsp salt
1 1/2 tsp pepper
1/2 beef sausage (I used 1/2 lb steak and 1/2 lb beef soup bones)
1 large onion - sliced into small pieces
3 large cloves of garlic (sliced or minced)
3 Tbsp olive oil

Directions
Soak beans overnight and rinse well.  In a large pan add enough water to cover beans about one inch.  Add salt and pepper  Bring to a boil.  Turn down and let simmer for 2 hours.  Meanwhile, in a small skillet, cook onion, garlic and olive oil over medium heat until onion is dark brown but not burned (takes approximately 1/2 hour).  Add onion mixture along with meat to the beans and let simmer for the remainder of the 2 hours.

Towards the end you can either mash a few beans to make it thicker, or if you prefer add a bit more water to make it more soupy (what we do).  Serve over rice.

Hint: When putting away leftovers we put the soup/liquid and the beans in separate containers otherwise the beans will soak up all the liquid.

Friday, May 18, 2012

Fisher Price Fridays - Little People Swimming Pool

As promised last week today I'll be sharing the Little People Swimming Pool #2526 on Fisher Price Fridays.  The pool was made between 1986-1989.  It is a simple set with a basic plastic pool base, 8 pieces and 2 people.


The set came with two little people, a boy and a girl.  The boy pictured is original set but the girl isn't.  She should be a blond girl wearing a blue dress.  My green lounge chair is also the wrong color it should be yellow.


The lifeguard chair and life preserver (which attaches to a hook the chair and can be worn by a little person in need of saving) came in either green or yellow.  The chair is exclusive to this set.  The life preserver came in either yellow or white and was later used (in white) on the cruise boat #2524.  Before the pool in other sets the life preserver was always yellow, this is the first set to come in white.

The slide came in either yellow, orange or green.  It is the same slide that was used in other sets including the #929 Nursery School and #923 Play Family School.   

The umbrella table is similar to other sets with umbrellas, but it fits in the base rather than standing alone.  It was exclusive to this pool set.  There are color variations in this piece as well including a yellow table with either a green or orange top.

The lounge chairs in the set were used in many previous FPLP (Fisher Price Little People) sets.  However, this was the first set that made the chair in orange instead of just yellow (the green is from a different set).  The grill is a special piece, with a lid that opens and closes.  It was also used in the #272 Lounge and Grill and the #260 Dollhouse Patio Sets, which are not FPLP but Dollhouse sets.

Like the Playground #2525 there are no lithographs on this set.  The pool deck has stones and boards designed in the plastic.  The bottom of the pool says Fisher Price.

The diving board comes in either white and green or white and yellow and is another piece exclusive to this set.

Here's how my daughter played with the pool recently.  Looks like she used an orange slide that time.

Stay safe in the pool, watch out for grumpy lifeguards. :)

Thursday, May 17, 2012

Mother's Day Loot

I had a great Mother's Day.  It was extra special this year because we were dedicating baby girl at church.  My parent's were in town for the event, so I got to be with my mommy on mother's day which doesn't happen very often. :)

My 4 year old is finally old enough to start making me gifts which I LOVE.  Look at this cute frame she "made" for me at Mom's Day Out.  It is a gigantic magnetic photo frame.

If you follow me on Pinterest a month or so ago I was pinning mother's jewelry like mad.  I wanted a new necklace that included baby-girl.  This is the one I ended up getting.  It is from Otis B Jewelry on etsy.  It has charms with the 1st initials of each of my girls.  

The charms are silver and the pearl is freshwater.  The baby approves, she likes to grab it while nursing.  Hopefully it is as durable as my nursing necklaces!

My other lovely Mother's Day treat was this colorful gerbera daisy plant from Trader Joe's.  I was going to buy it for myself but our favorite check-out-person insisted that I get it for free. :)  The Arrowhead Trader Joe's location is the best!  

Wednesday, May 16, 2012

Wordless Wednesday - Chipotle Angel

You may remember that I dressed my baby up like a chicken a few times this fall/winter.  So when the 4 year old wanted to dress up like a angel for our weekly trip to Chipotle how could I refuse?

Chipotle didn't blink an eye at the get-up.

Tuesday, May 15, 2012

Magic Cookie Bars

This weekend I was busy making lots of goodies.  I mentioned the magic cookie bars but thought I'd give you the recipe today.  Now, if you live under a rock you may have never heard about Magic Cookie Bars.  Or perhaps you know them by another name, I've heard them called Hello Dolly Bars.  Around here they are known as daddy's favorite bars. :)

They are very simple to make and oh-so-delicious.  We make a standard recipe but with a small twist. Instead of graham cracker crumbs we use Maria cookies.  My mother-in-law made the recipe with Maria cookies so that's what my husband prefers.  I can't always find Maria cookies, but just the other week I saw them at World Market (aka Cost Plus).  

I forgot to take photos when they were fresh, and there was only a tiny section left in the pan today.  But they still look (and taste) good. 

Magic Cookie Bars
Ingredients
1/2 cup of melted butter
1 1/2 cups Maria cookie crumbs (used a blender), can also use graham crackers
14 oz sweetened condensed milk (one can)
1 - 1 1/4 cup semisweet chocolate chips (original recipe calls for 2 cups)
1 1/3 cups flaked coconut
*optional 1 cup chopped nuts

1. Heat oven to 350 (325 for glass).  
2. Combine cookie crumbs and butter.  Press into the bottom of the pan (you can grease the pan if it is prone to stick).  Pour sweetened condensed milk evenly over crumb mixture.  Layer evenly with chocolate chips, coconut and nuts if you used them.  Press down firmly with a fork.
3. Bake 25 minutes or until the coconut is lightly browned.  Cool.  Cut into squares or just eat out of the pan (that's what we do around here).  Store covered at room temperature.  

It's hard to eat just one so you may want to put them out of sight if you are prone to snacking. :)  My husband hid them in the oven.  Ha!

Sunday, May 13, 2012

Happy Mother's Day

Happy Mother's Day to my favorite mother. :)  So glad that we get to spend the day together.

Not only are you the best mother but you are a wonderful, thoughtful, consistent and patient grandmother.  We are blessed to have you.

Happy Mother's Day!